HG / Costco Contract Guide

Heavenly Greens — Sales Rep Trail Map

1. Create Contract 2. Get It Signed 3. Countersign 4. Installer Packet 5. Change Orders
Resulting in CENTAH — record Sale / No Sale →
Stage 1Creating the Contract Stage 2Getting It Signed Stage 3Countersigning Stage 4Installer Packet Stage 5Change Orders

Quick Navigation

  1. Pre-Contract Build Checklist — the four fields that must be on the contact first
  2. Stage 1 — Creating the Contract — open contact, fill form, submit
  3. Stage 2 — Getting It Signed — review draft, approve, member signs
  4. Stage 3 — Countersigning — your turn to sign
  5. Stage 4 — Building the Installer Packet — Project Documents Uploader
  6. Stage 5 — Completing a Change Order — scope changes after signing
  7. After the Install — Job Auth, Job Completed, ACH Payments
  8. Editing Contact Fields — fixing info before or after
  9. If Something Goes Wrong — common issues + fixes

Related guide: Resulting in CENTAH — recording Sale / No Sale in the Costco portal after every appointment.

Pre-Contract Build Checklist

These four fields must be on the member's Contact record before you open the form. If they're missing, the contract will still build, but the system will fire warnings and Costco-side reporting will not match up.

1. Costco Lead #

The lead number from the CENTAH email. This is what ties the contract to the Costco opportunity.

Contact Profile → custom field "Costco Lead #"

2. Costco Membership #

The member's Costco membership number. Required for the Shop Card reward calculation to print correctly on the contract.

Contact Profile → custom field "Membership #"

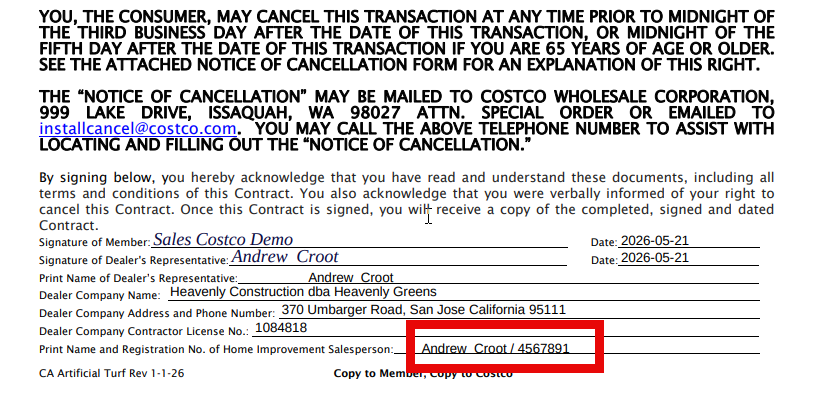
3. Your HIS # (Registration #)

Your Costco-registered sales rep number. Lives on your user record — should auto-populate, but verify it's on the contact.

Auto-filled from your AGM user account

4. Member 65+ Status

Critical for cancellation window. Under 65: 3-business-day cancellation. 65 or older: 5-business-day cancellation. California law — get it right.

Contact Profile → custom field "Over 65"
Quick tip: Pull the CENTAH email up before you start. Lead # and Membership # both live there. Copy them into the contact, then open the form.
One blocker that will stop the contract cold: If your rep email on the contact record is blank or pointing to a decommissioned mailbox, the system will refuse to send the contract and alert the office. Make sure the contact is assigned to you with your active @heavenlygreens.com address.
Stage 1

Creating the Contract

Open the contact, fill the form, submit. The draft builds itself.

The three things you do

  1. Open the contact in AGM (Contacts or Conversations)
  2. Fill out the Costco Contract Form
  3. Submit — the draft is built automatically

You'll get an email or SMS when it's time to start

When an appointment is confirmed, you'll receive a notification. That's your cue.
Email notification to start contract process

SMS notification

You may also receive an SMS message as a trigger.
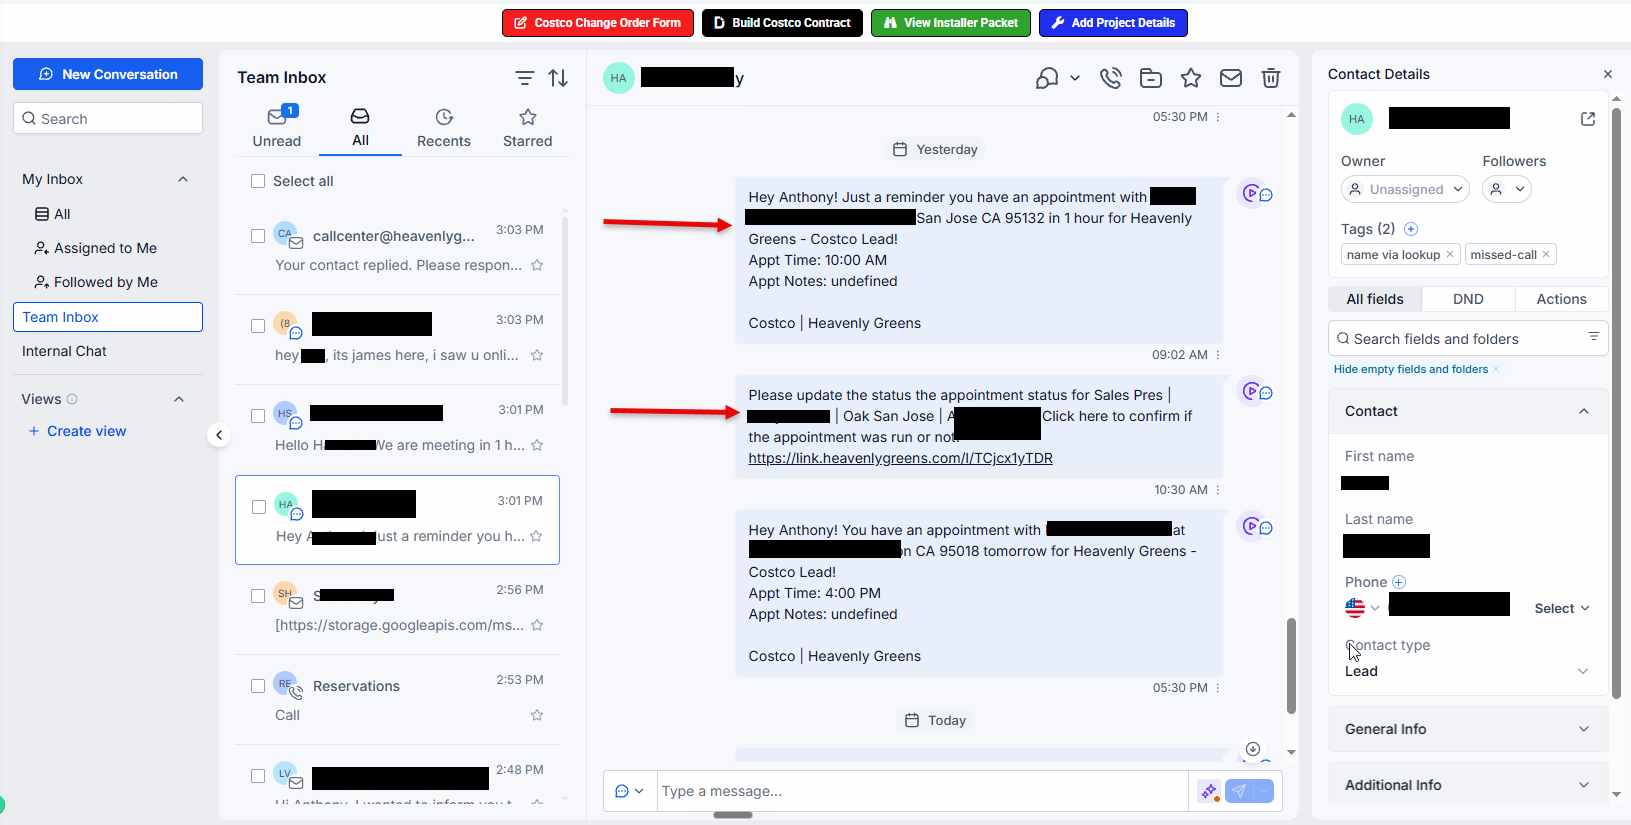
SMS notification

1. Open the contact in AGM

Two ways in — use whichever is faster:

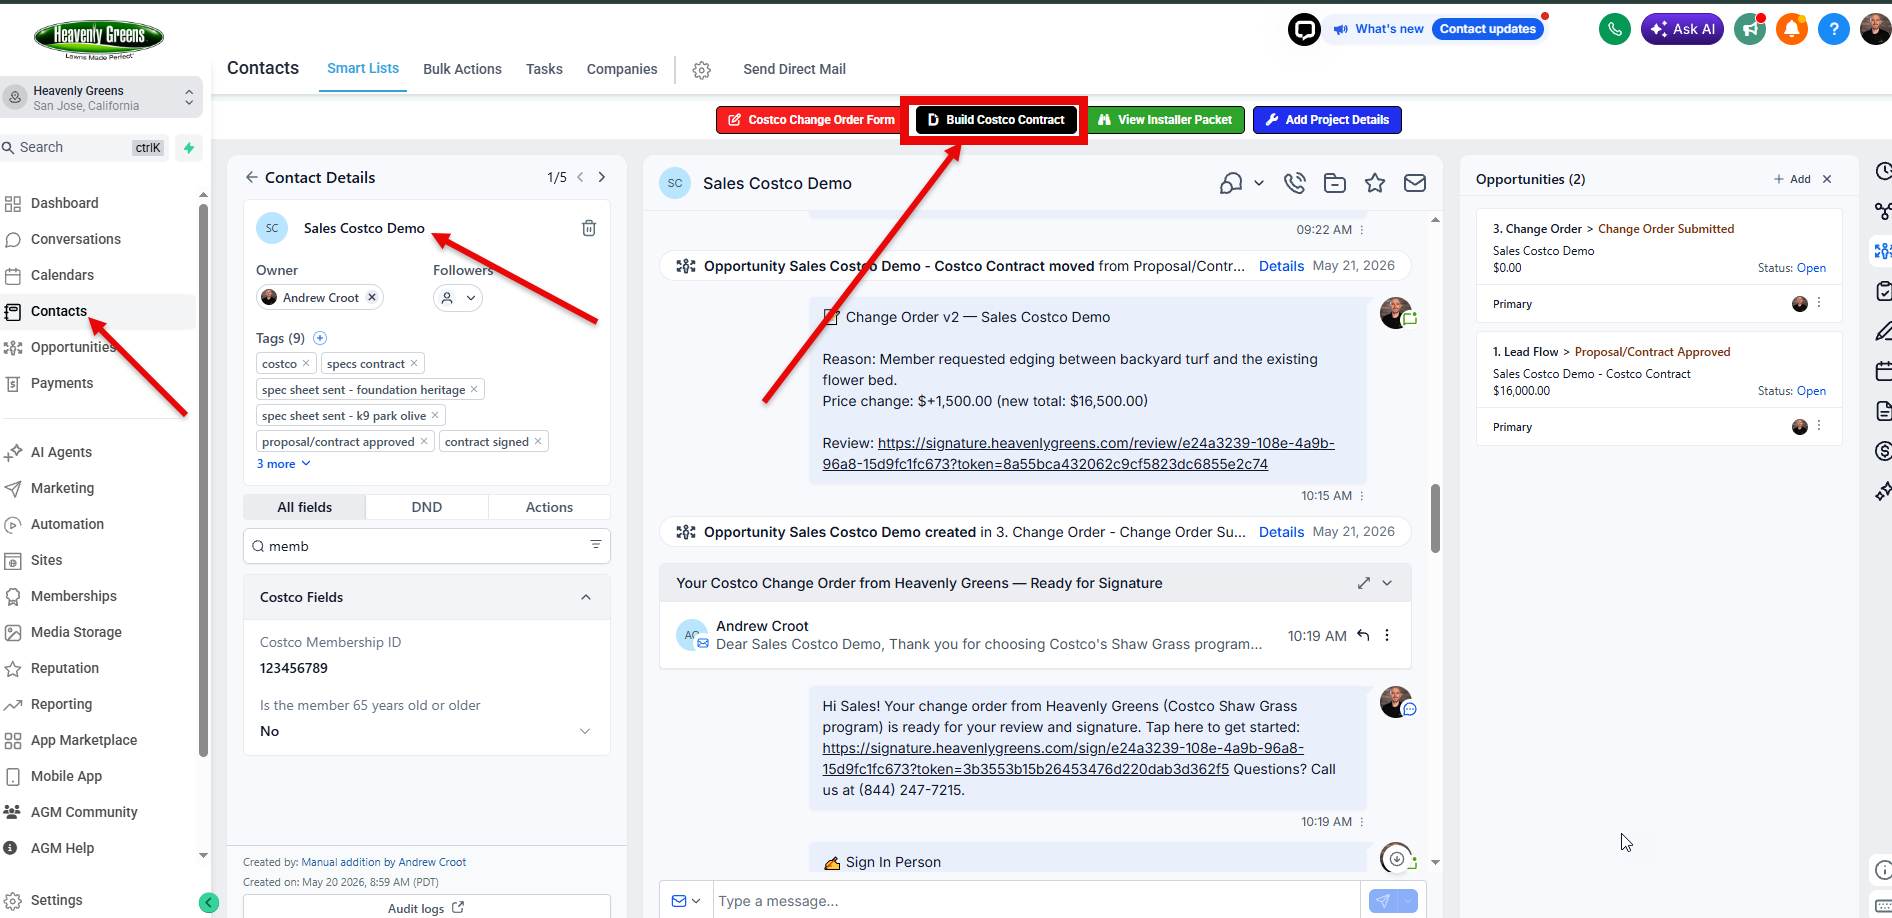
  • From Contacts — find the member → open their profile → click "Build Costco Contract"
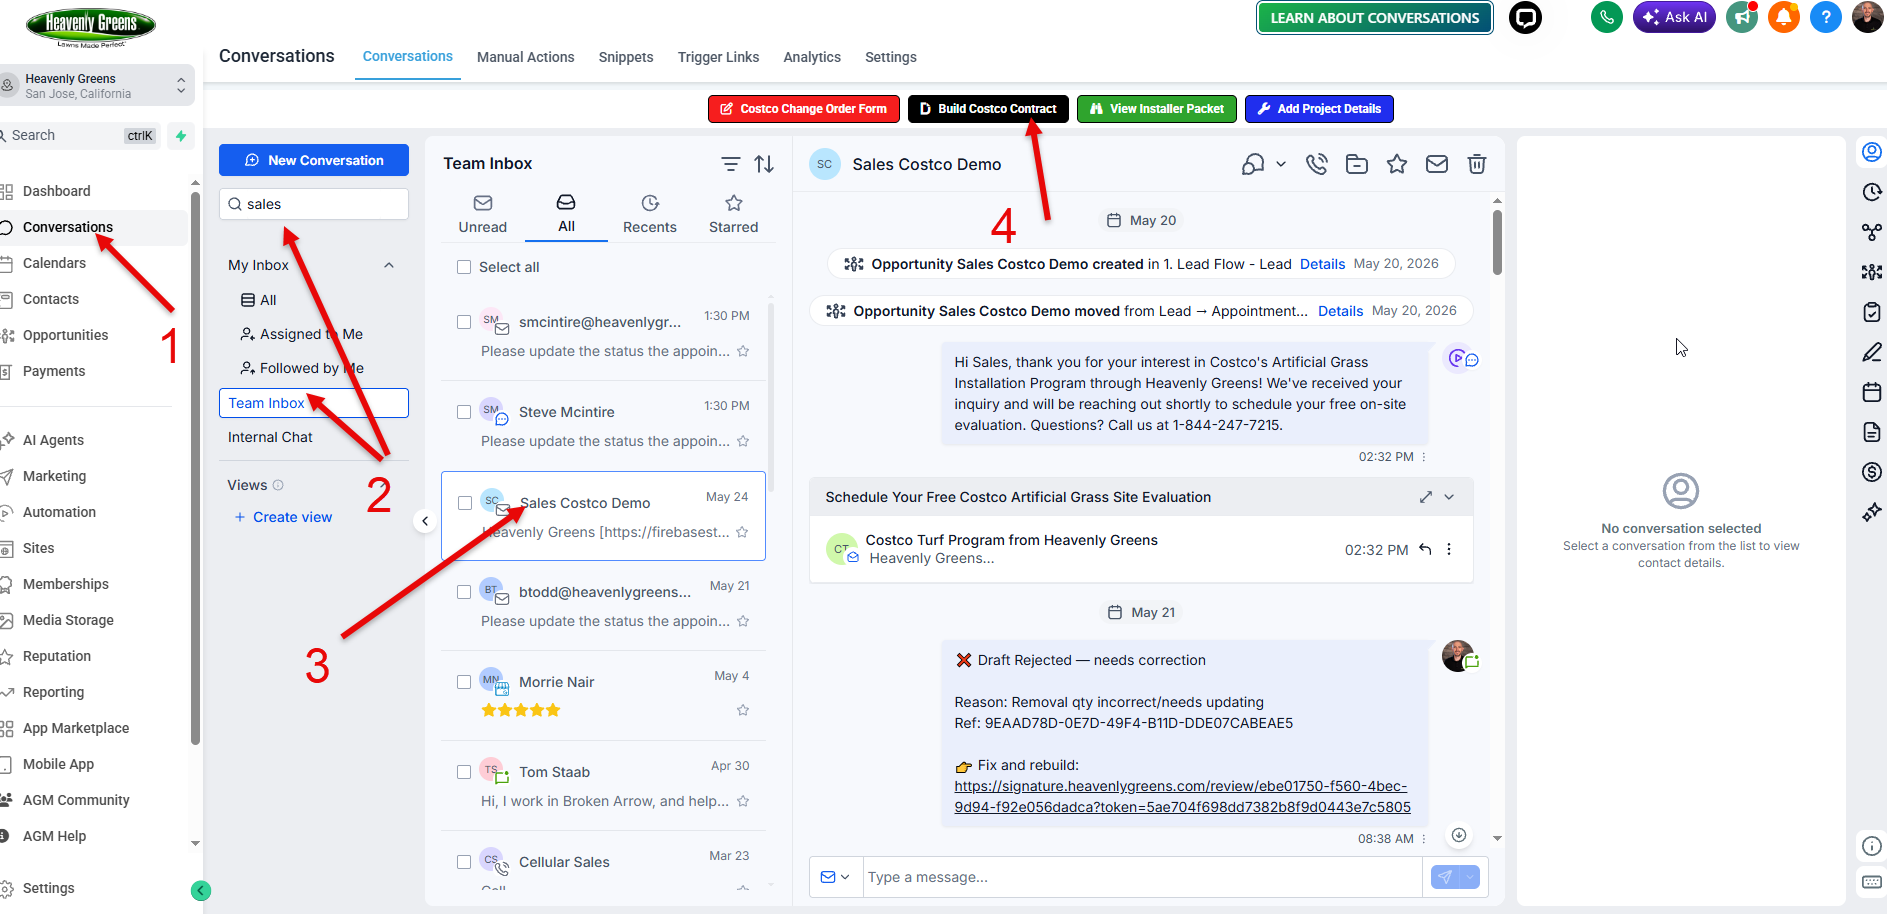
  • From Conversations — find the member's thread → click "Build Costco Contract"
Look for the black "Build Costco Contract" button at the top of the contact profile.
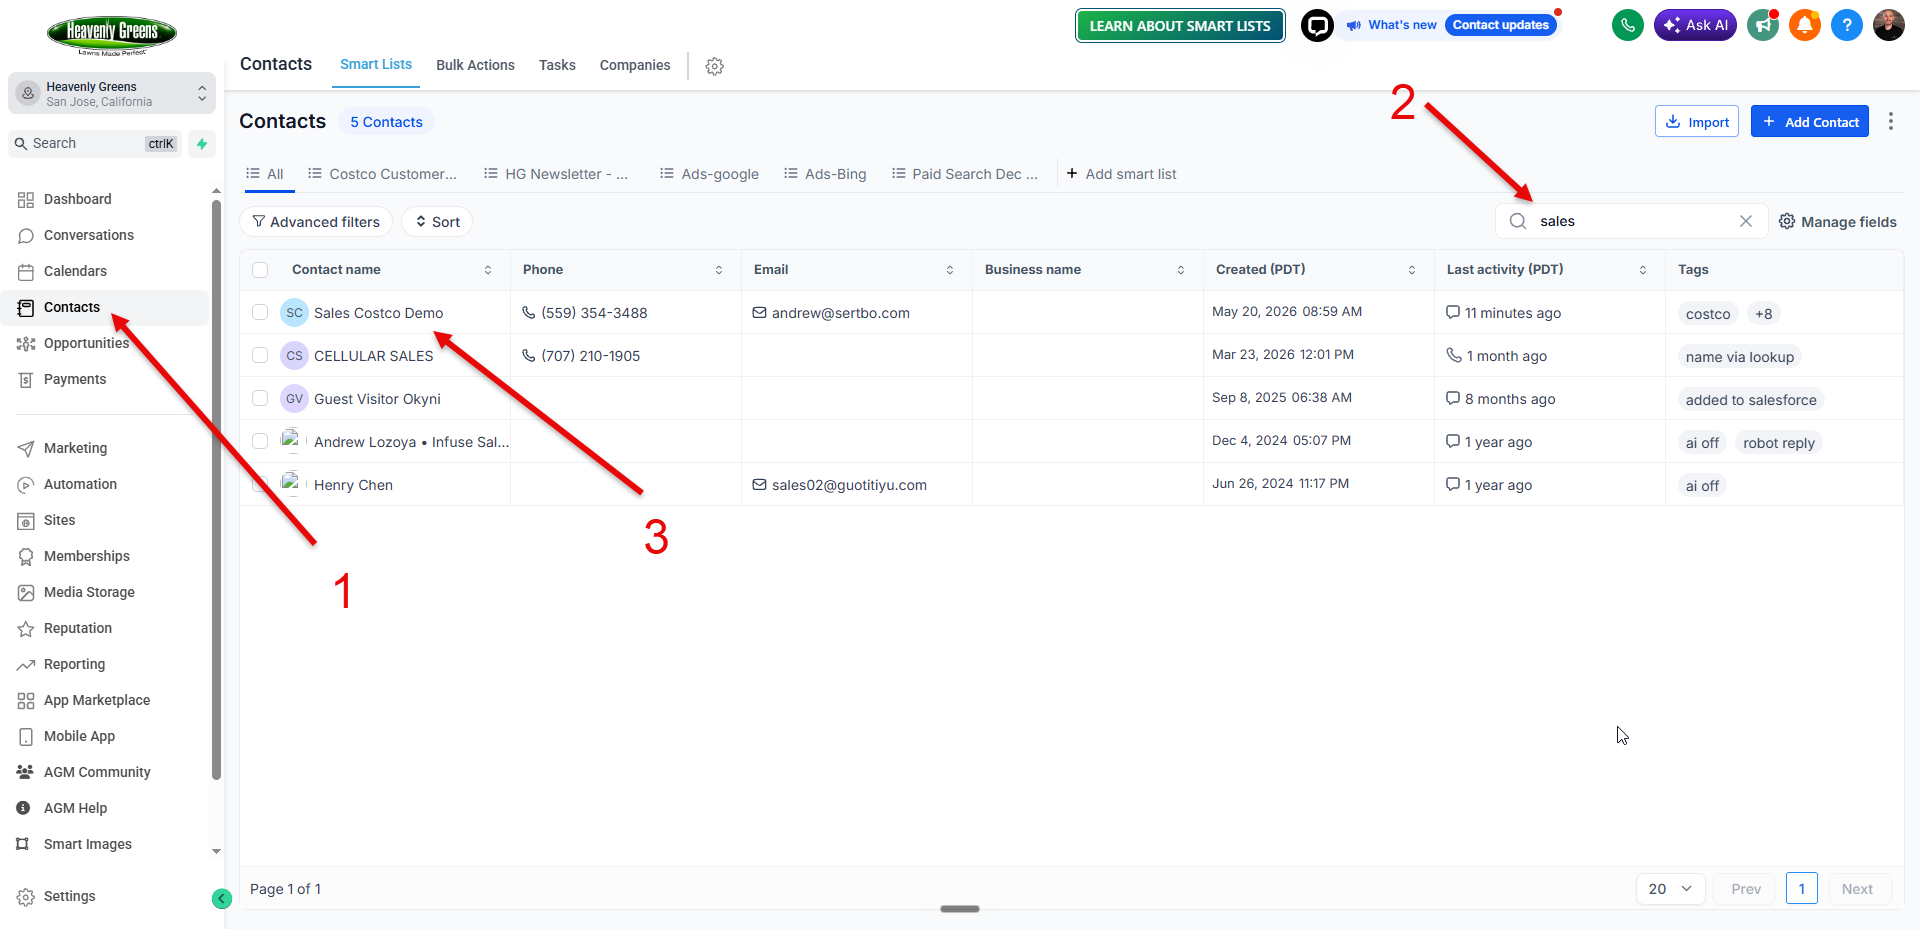
Finding and opening a contact via Contacts
The black Build Costco Contract button at the top of the contact profile
Finding and opening a contact via Conversations

2. Fill out the form

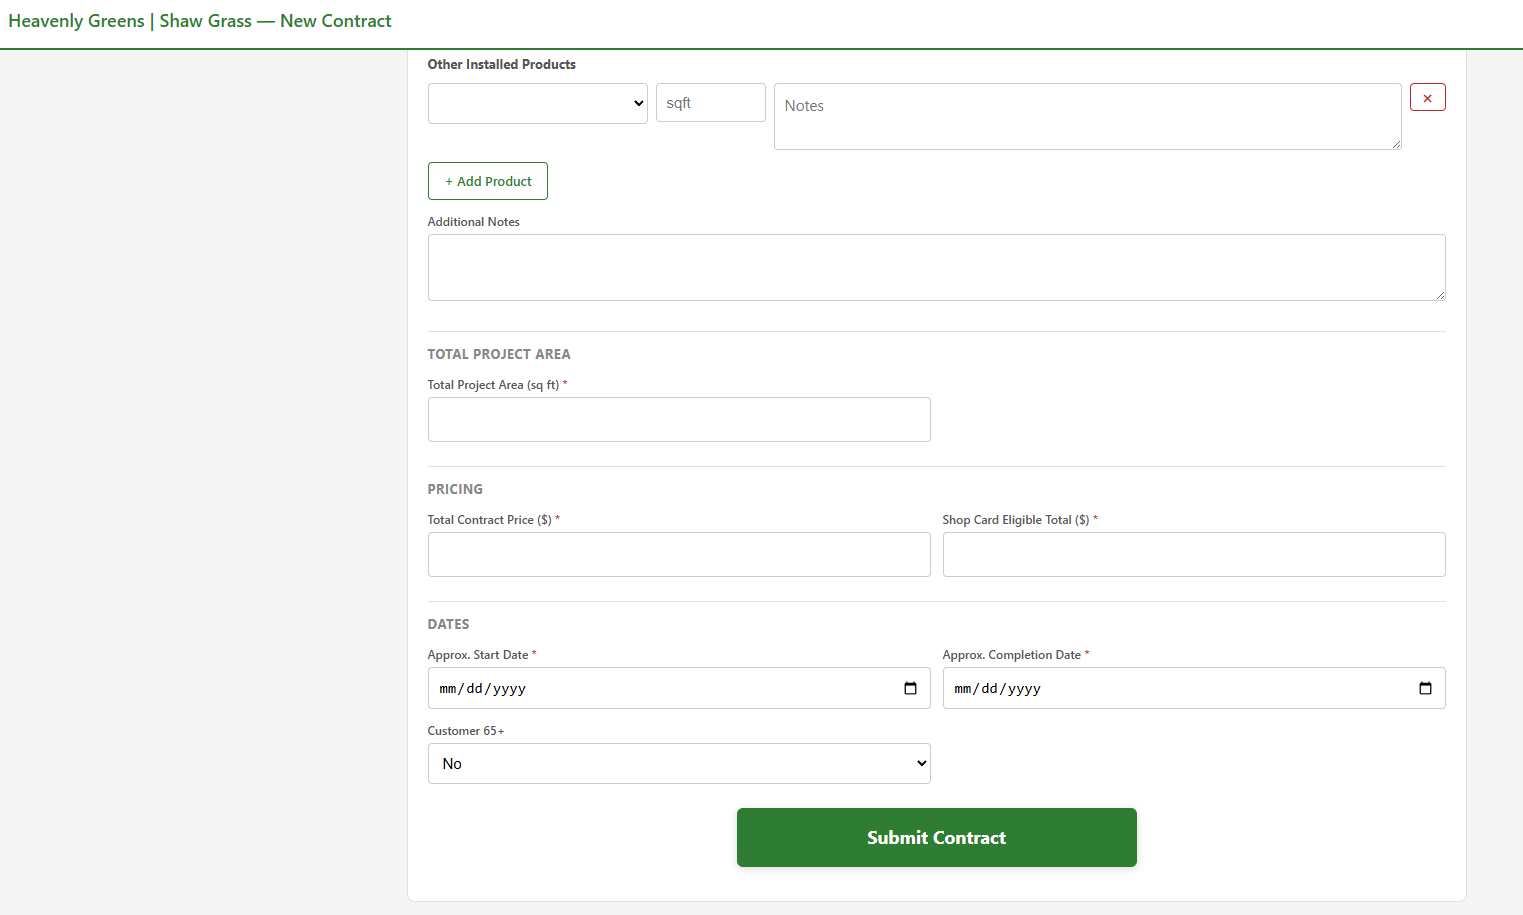
Enter all member info and select products from the dropdowns. When you pick a product, the quantity and notes fields appear automatically. Fill in every field.

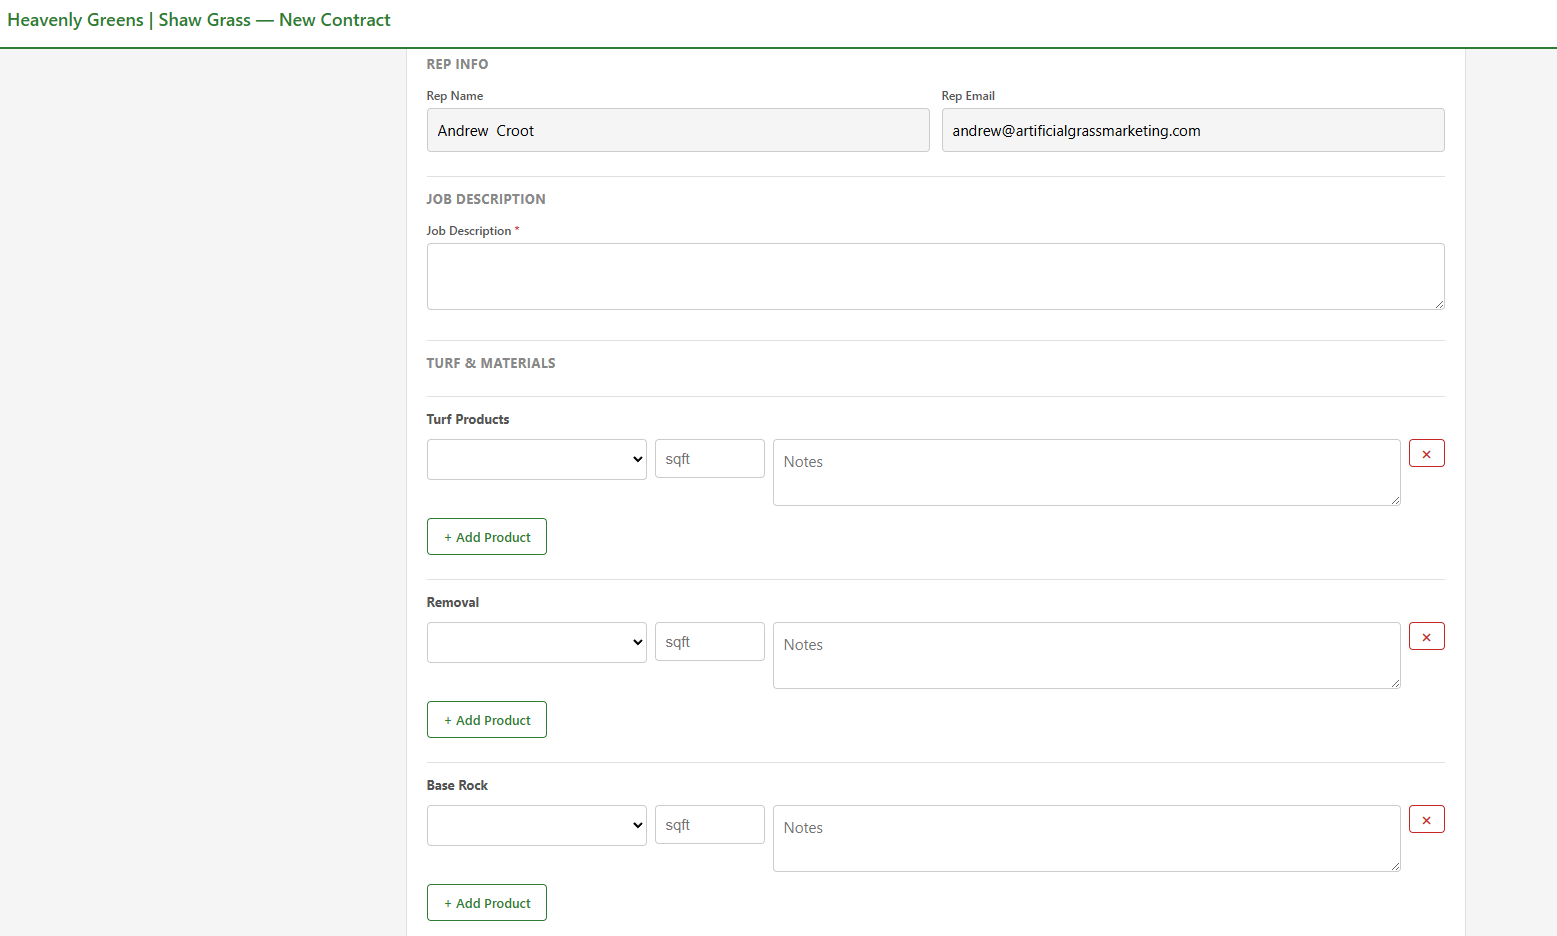
Completing the contract form
Product selection details
Additional form fields
Form fields continued

3. Submit the form

Once all fields are completed, hit Submit. All information is added to the contract engine to build the contract.

You can make changes before sending the contract after reviewing it.
What happens behind the scenes: The moment you hit submit, the system mints a unique job number (HGC-XXXXX) and stamps it on the contact record. That's your reference for the rest of the deal. If you resubmit the form for any reason, the same job number is reused — no duplicates.
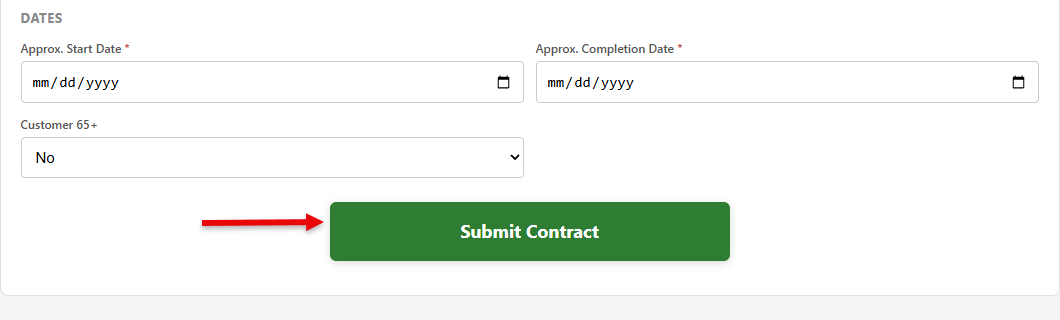
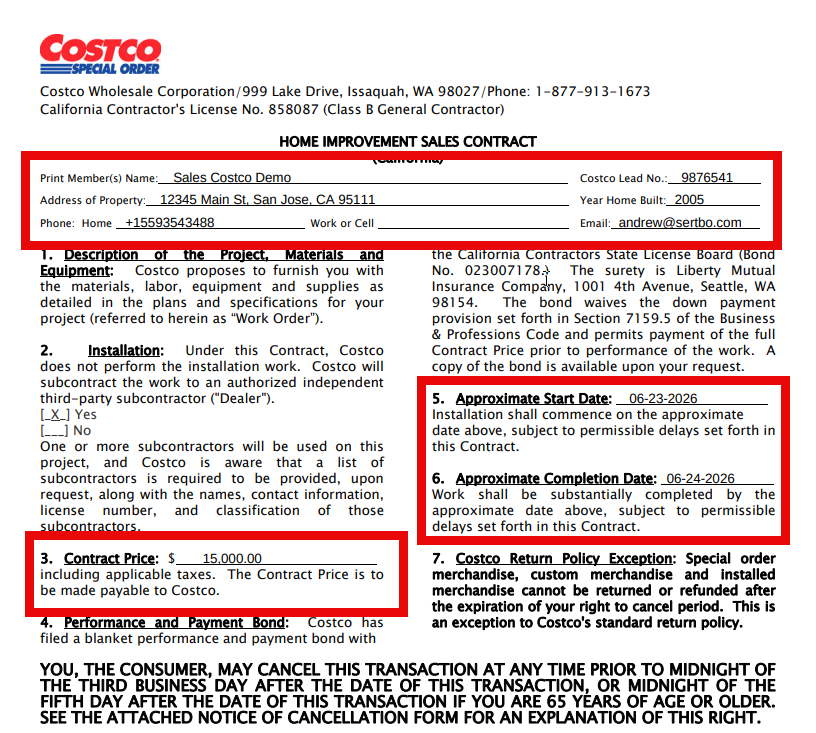
Submit the form
Stage 2

Getting It Signed

You review the draft. You approve. The member signs.

The three things you do

  1. Review the draft that loads after submitting the form, or open the draft link from the notes section in the contact record inside AGM
  2. Approve and send the draft (or reject, fix the data in AGM, and resubmit)
  3. The member gets the signing link in their AGM conversation thread and signs

1. Review the draft contract

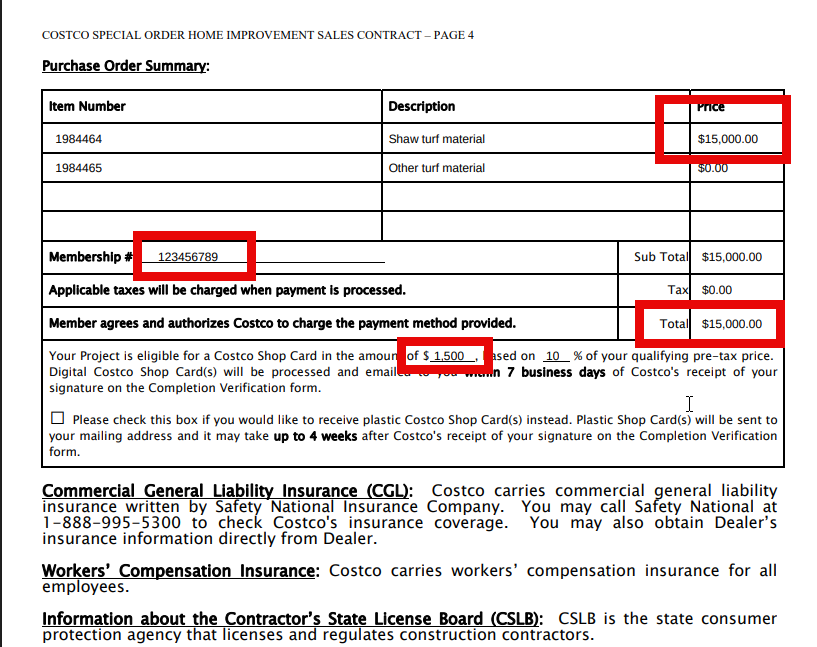
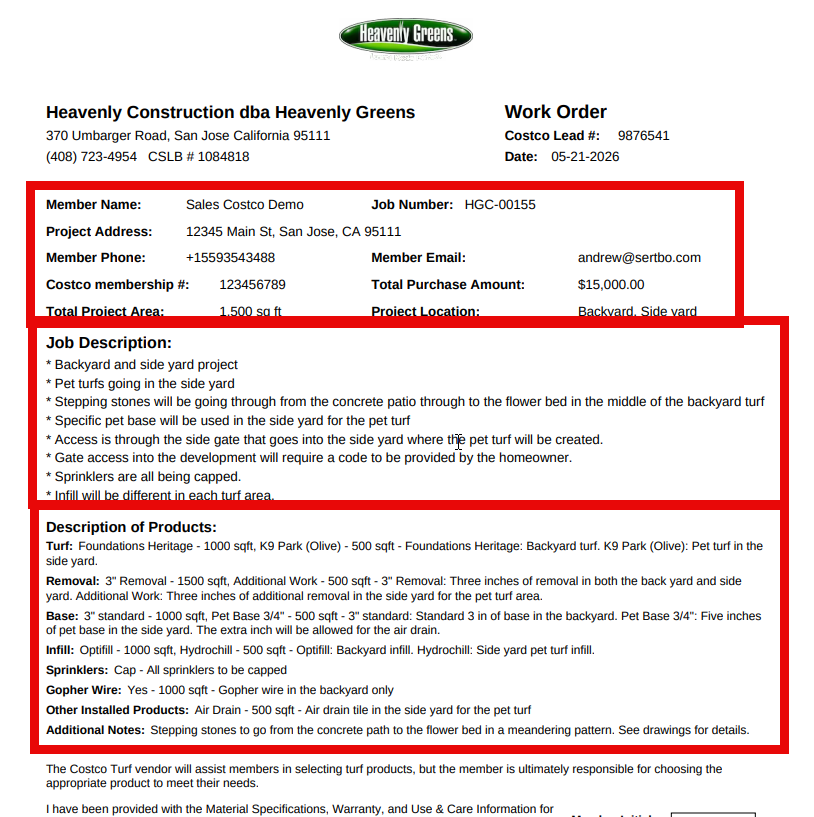
After you submit the form, the draft contract loads on screen. You can also reopen it anytime from the draft link in the contact's Notes section inside AGM. Review it to make sure everything's correct before you send it.

Reviewing the draft contract
Reviewing the draft contract - continued

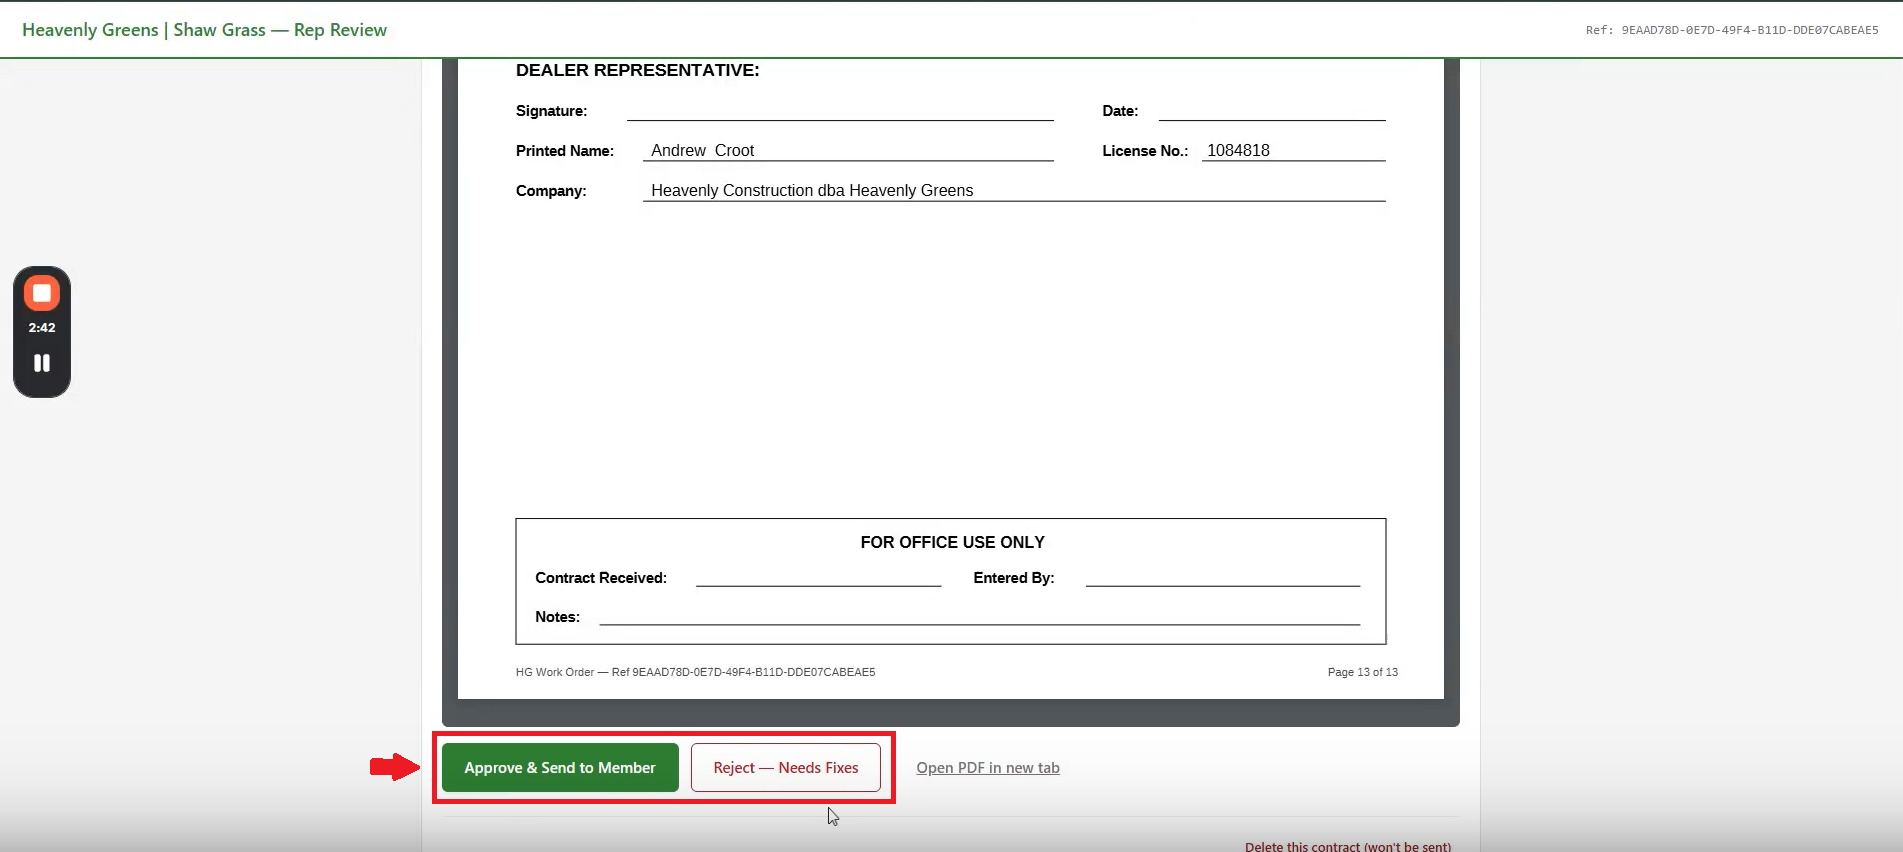
2. Approve or Reject

When you're done reviewing, choose one: click "Approve & Send to Member" to send the contract for signature, or "Reject — Needs Fixes" if something needs correcting.

Reject path — if something's wrong:
  1. Click "Reject — Needs Fixes."
  2. Enter the reason for the correction, then click the buttons to continue back to the form.
  3. Make your edits in the original contract form.
  4. Hit Submit again — the draft rebuilds with your changes (same job number).
Approve or Reject the draft contract

3. Send for signature

After clicking the Approve & Send to Member button, there are two choices on how the contract can be signed:

  • Member receives email and SMS for signing on their devices — the member receives an email and/or SMS with a link to review and sign the contract.
  • Sign in person with the sales rep — the rep opens the contract for the member on their device and allows them to review and sign it there without having to access their own email or SMS.

One more thing happens automatically:

  • The Specs & Warranty sheet for the turf type on the contract is sent to the member alongside the signing link.

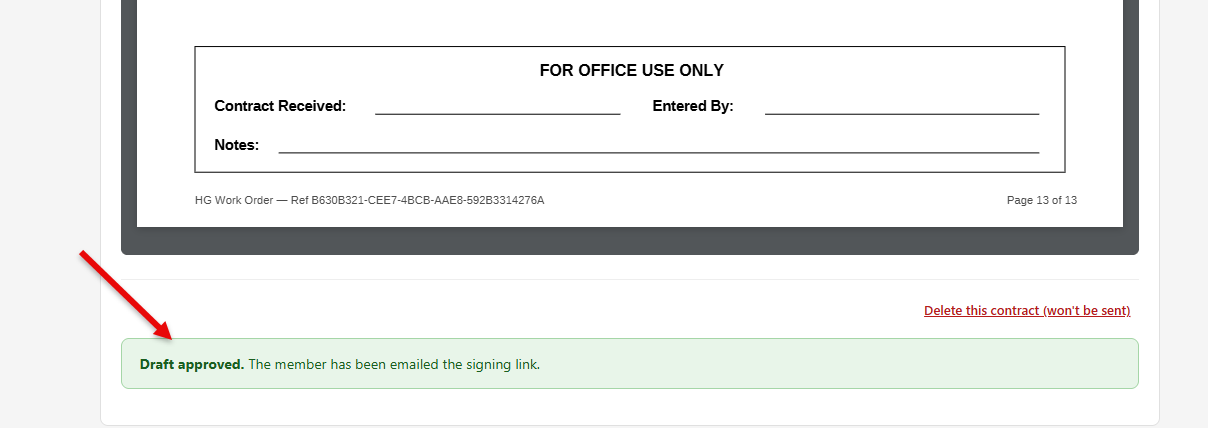
Draft approved — member notified

The banner confirms the draft is approved and the signing link is on its way to the member.

Draft approved confirmation banner

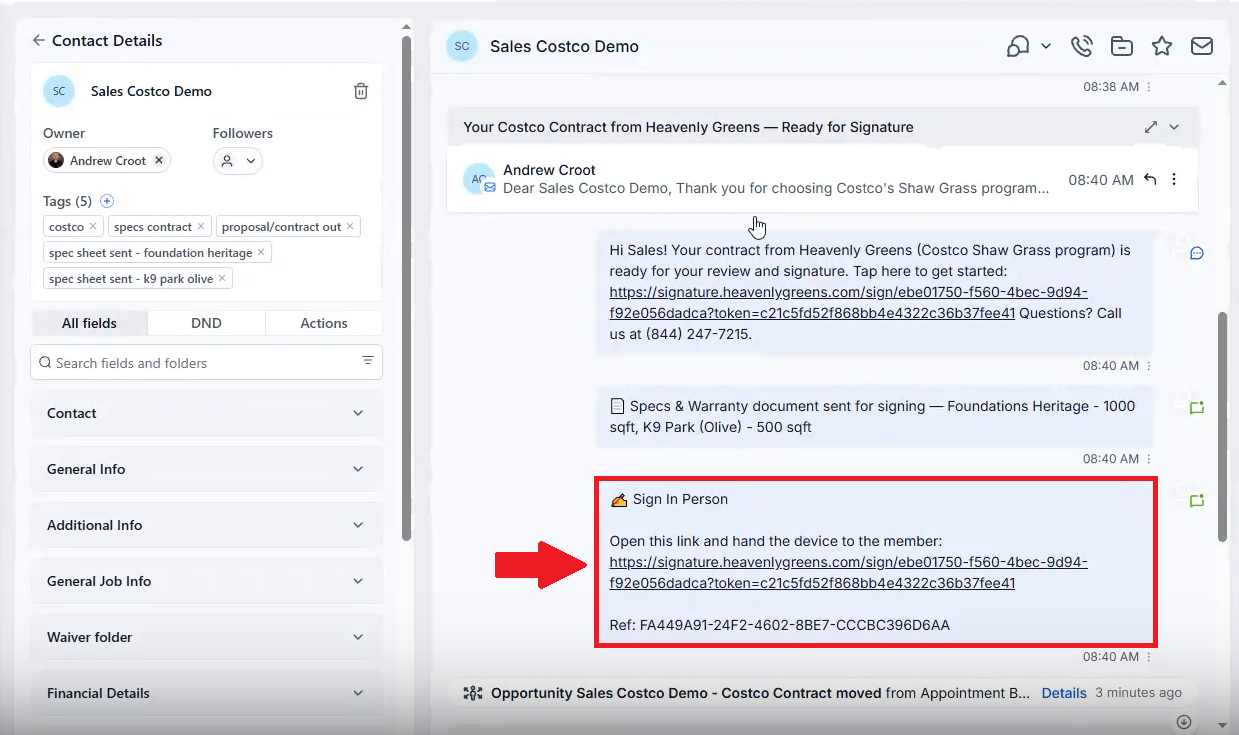
In-person signing link in the conversation

A Sign In Person link drops into the contact's AGM conversation. Sitting with the member? Tap it and hand them your device. If you aren't with the member, ignore this link — they already have it via email and SMS.

In-person signing link in the AGM conversation thread

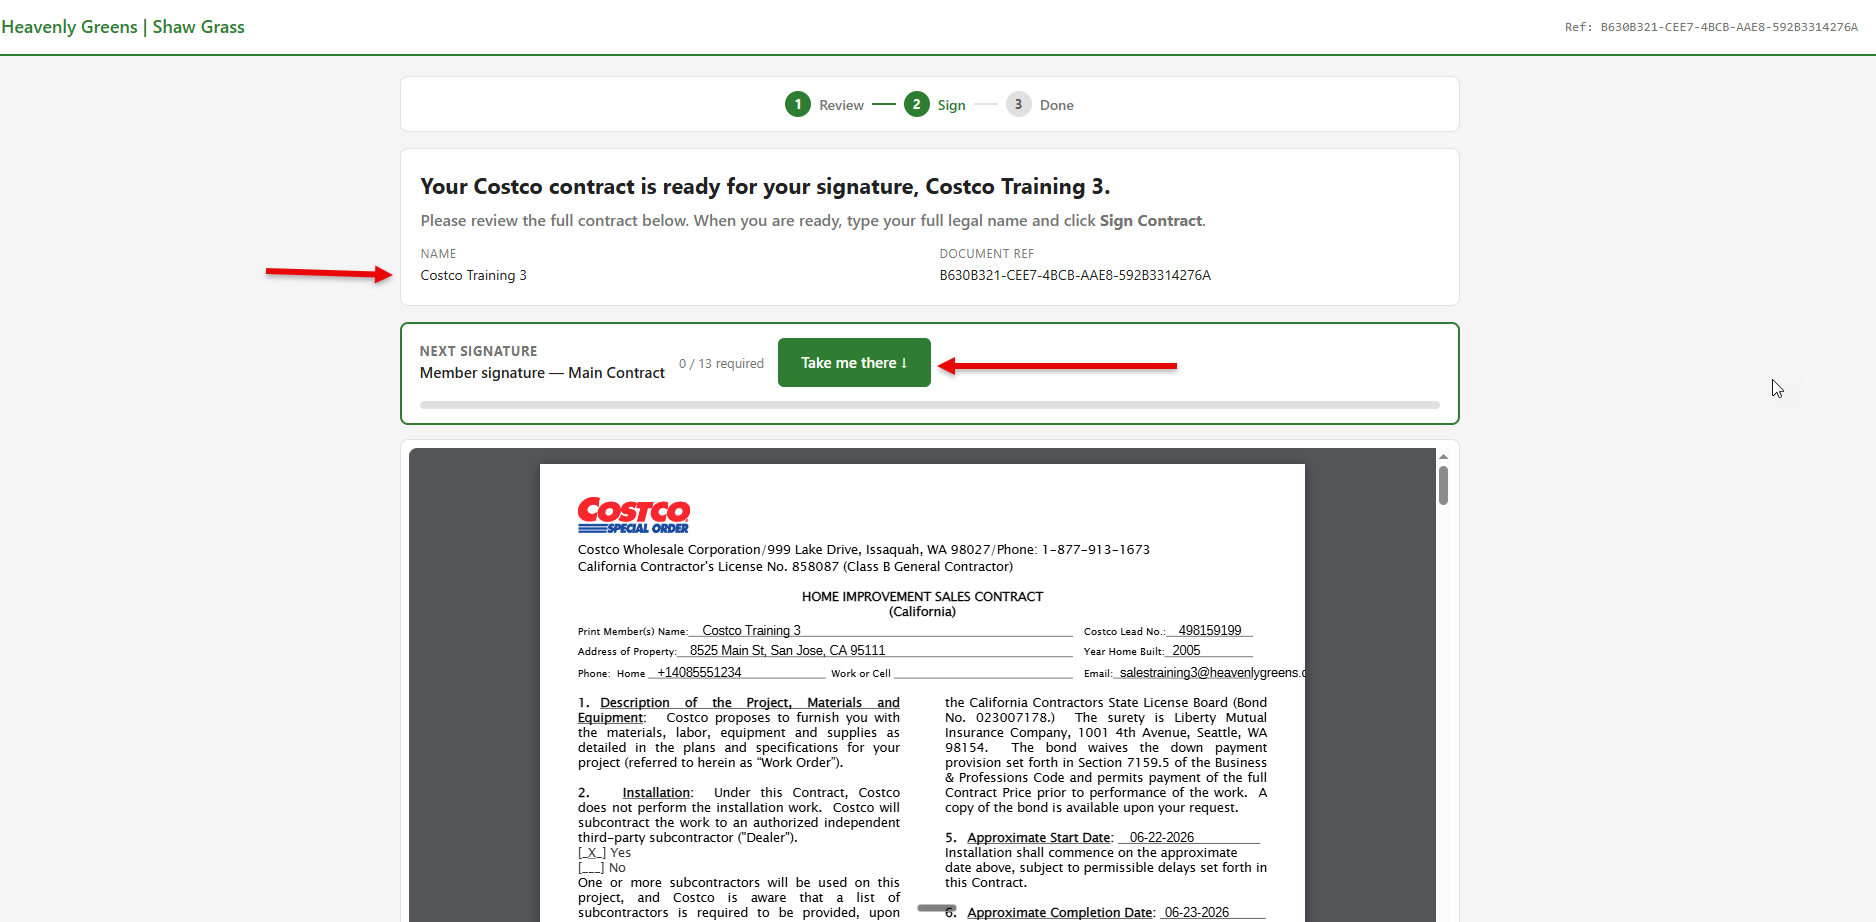
What the member sees first

The member lands on a name confirmation and a Take Me There button that walks them through the contract. 13 required fields (signatures, initials, dates) plus two optional ones at the end: the plastic Costco Shop Card request and the 65-and-over confirmation, if either applies.

Member's first view of the contract with Take Me There button

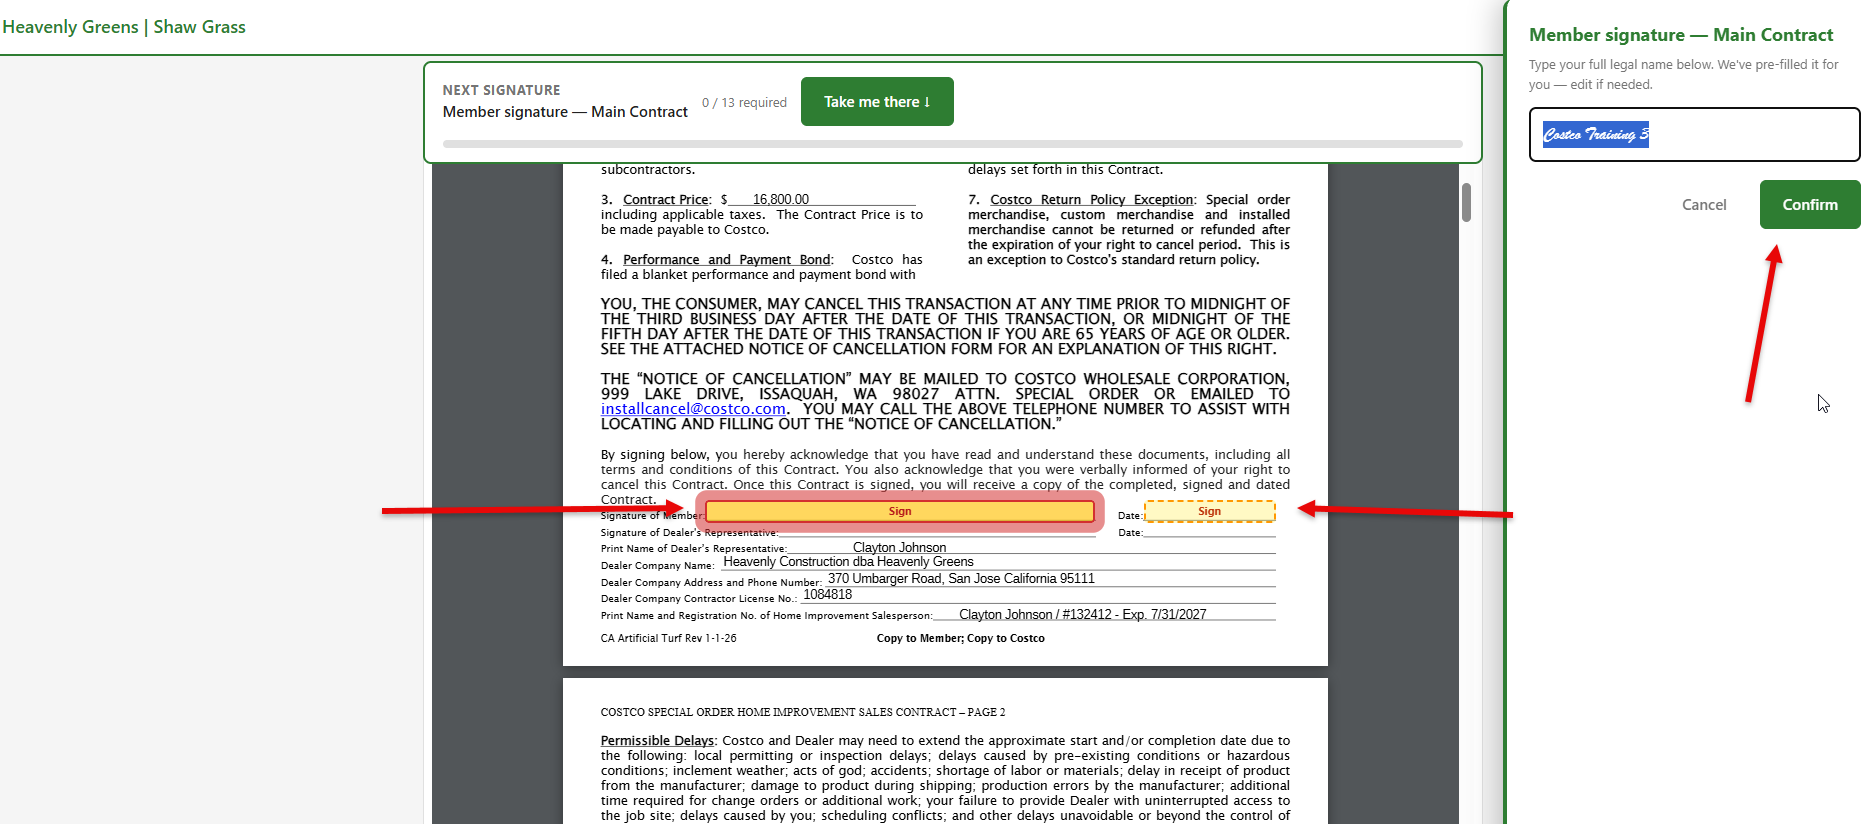
Take Me There guides them field by field

Each tap of Take Me There jumps the member to the next required field. They sign or initial, click Confirm, and the contract advances.

Take Me There guiding the member to the next field with Confirm button

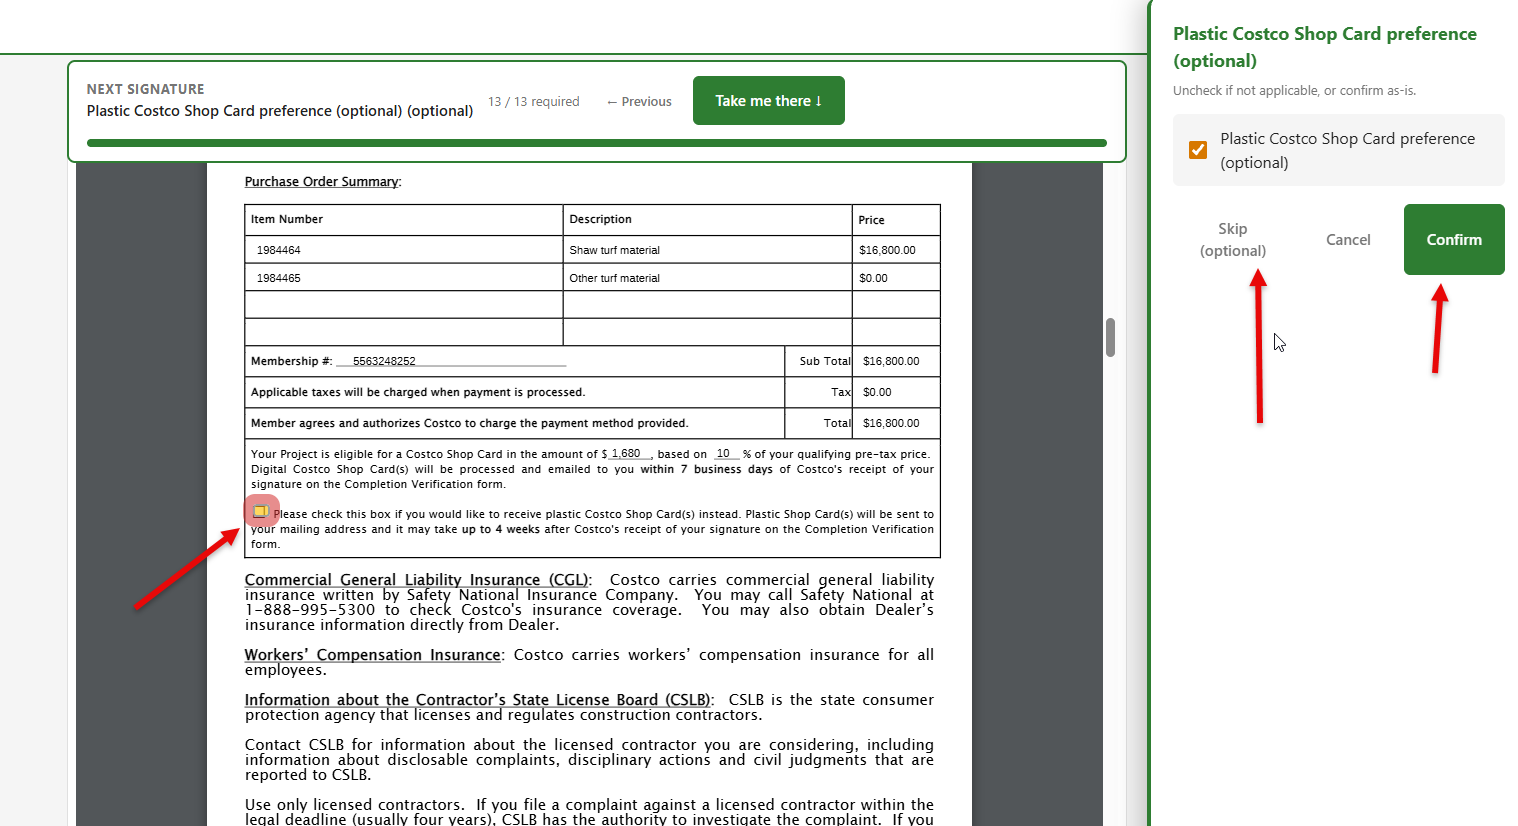
Optional: plastic Costco Shop Card

If the member wants the physical Shop Card instead of the amount issued to their digital wallet, they click Confirm — a checkbox lands on the contract. If they'd rather take the digital wallet credit, they click Skip.

Optional plastic Costco Shop Card opt-in step

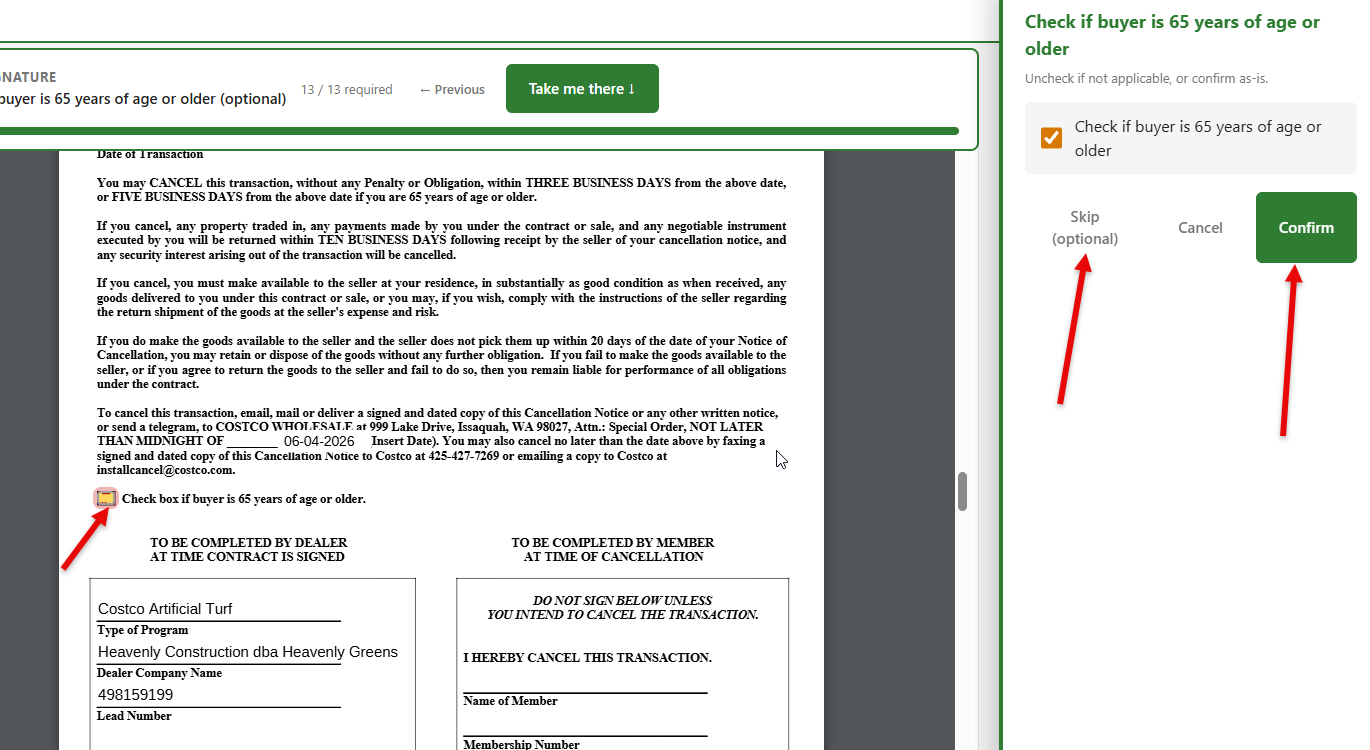
Optional: 65-and-over confirmation

If the member is 65 or older, this field usually pre-populates from the contract form. If it was missed, the member clicks Confirm to add it. If it's already correct (or doesn't apply), they click Skip.

Optional 65-and-over member confirmation step

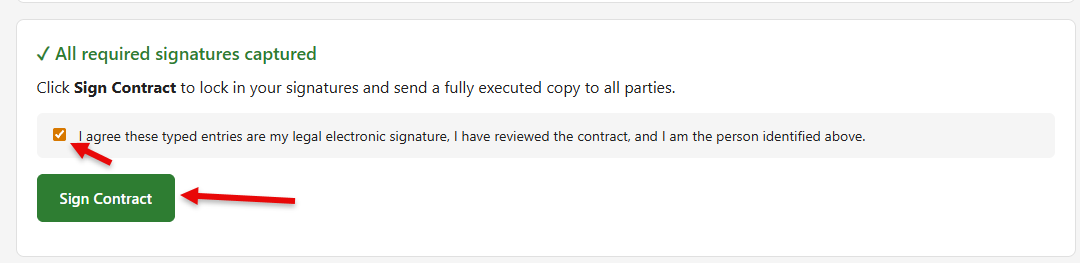
Final step: I agree & Sign Contract

Once every required field is complete, the Take Me There button changes to Go to Submit. The member clicks it, sees the confirmation that all required signatures are captured, ticks the I agree box, and clicks Sign Contract to finish their portion.

I agree checkbox and Sign Contract button at the bottom of the contract

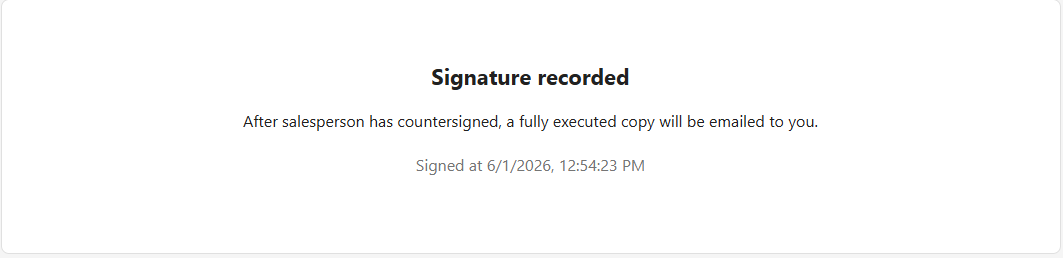
Member done — rep gets the link next

The member sees this confirmation that their portion is complete. At the same time, the sales rep receives an email with their own link to countersign the contract.

Confirmation message shown to the member after signing
Before the member signs

What if a change to the contract is needed before the member signs?

The contract is already out with the member and you're waiting on their signature — but something needs fixing or updating before they sign. Maybe you spotted it, maybe the member did: a wrong turf color, a price to adjust, a line item to add or change. As long as the member hasn't signed yet, you can pull the contract back, correct it, and resend. This is the Withdraw & Correct path.

Member already signed? That's a Change Order — Stage 5. Haven't sent it to the member yet? Just hit Reject at the draft step in Stage 2.

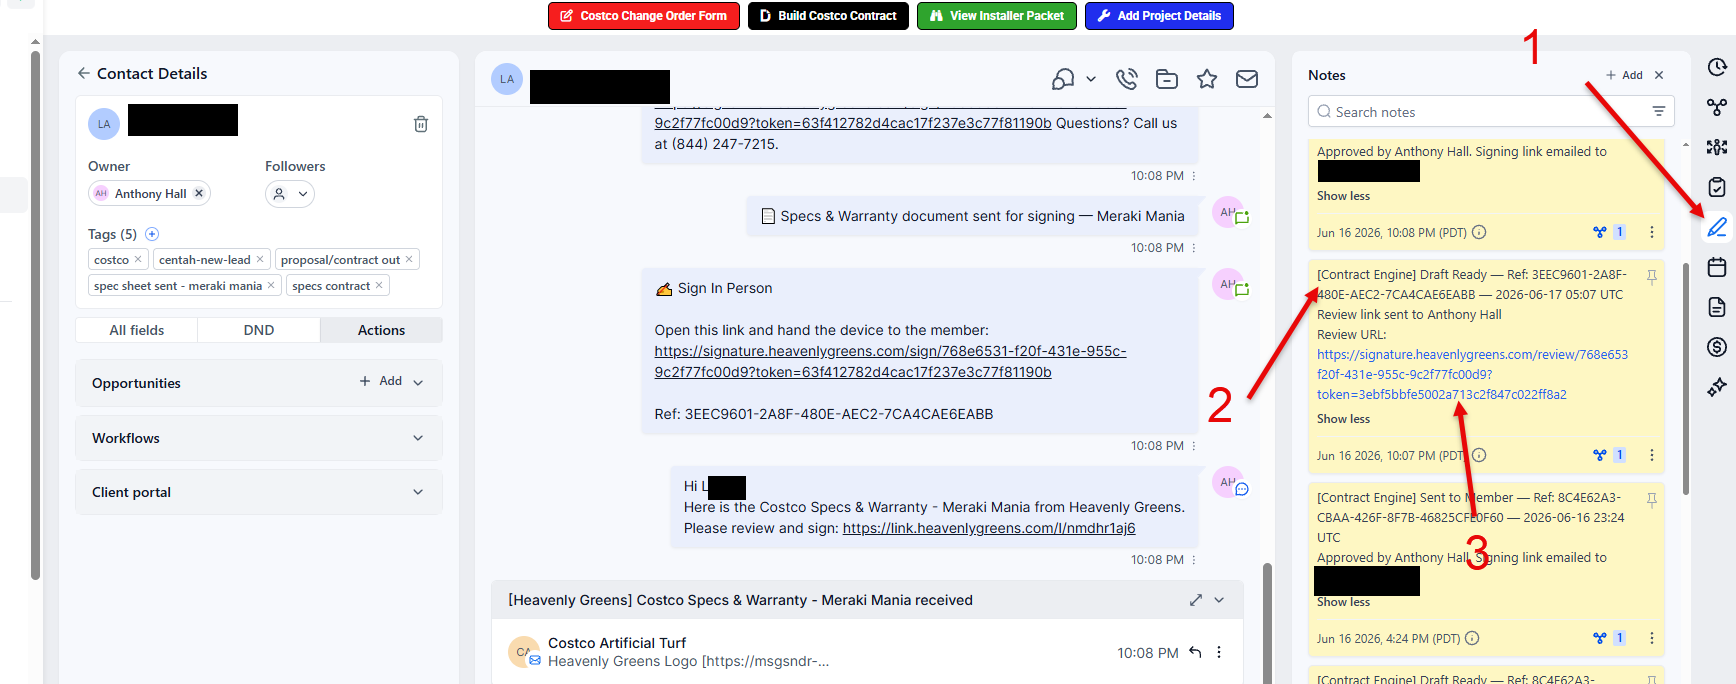
1. Open the Rep Review page from the contact's Notes

In AGM, open the contact and find the [Contract Engine] Draft Ready note in the Notes panel on the right. Click the Review URL in that note to open the Rep Review page.

Finding the Contract Engine Draft Ready review link in the AGM contact Notes panel

2. Click Withdraw & Correct

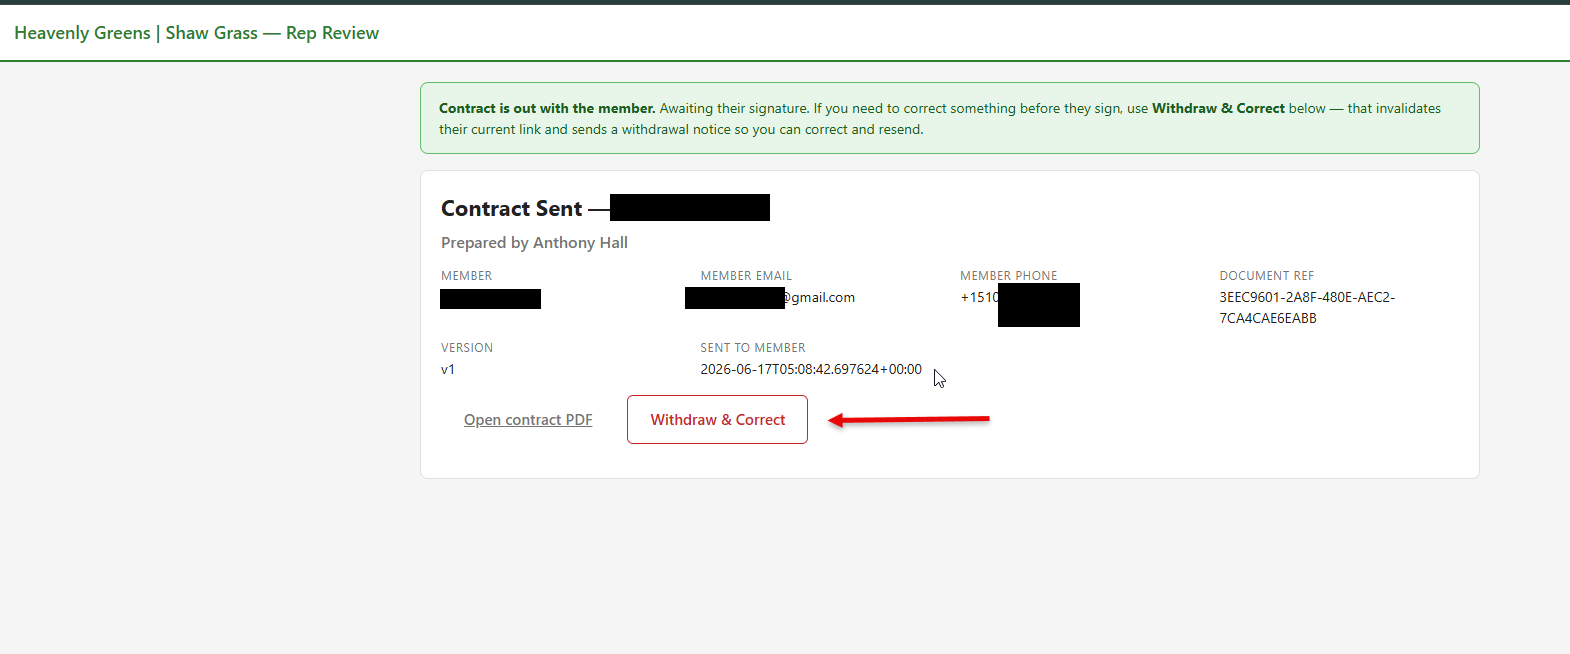
The Rep Review page shows a banner: "Contract is out with the member. Awaiting their signature." Click the Withdraw & Correct button.

The Withdraw and Correct button on the Rep Review page

3. Enter a reason, then Confirm Withdraw

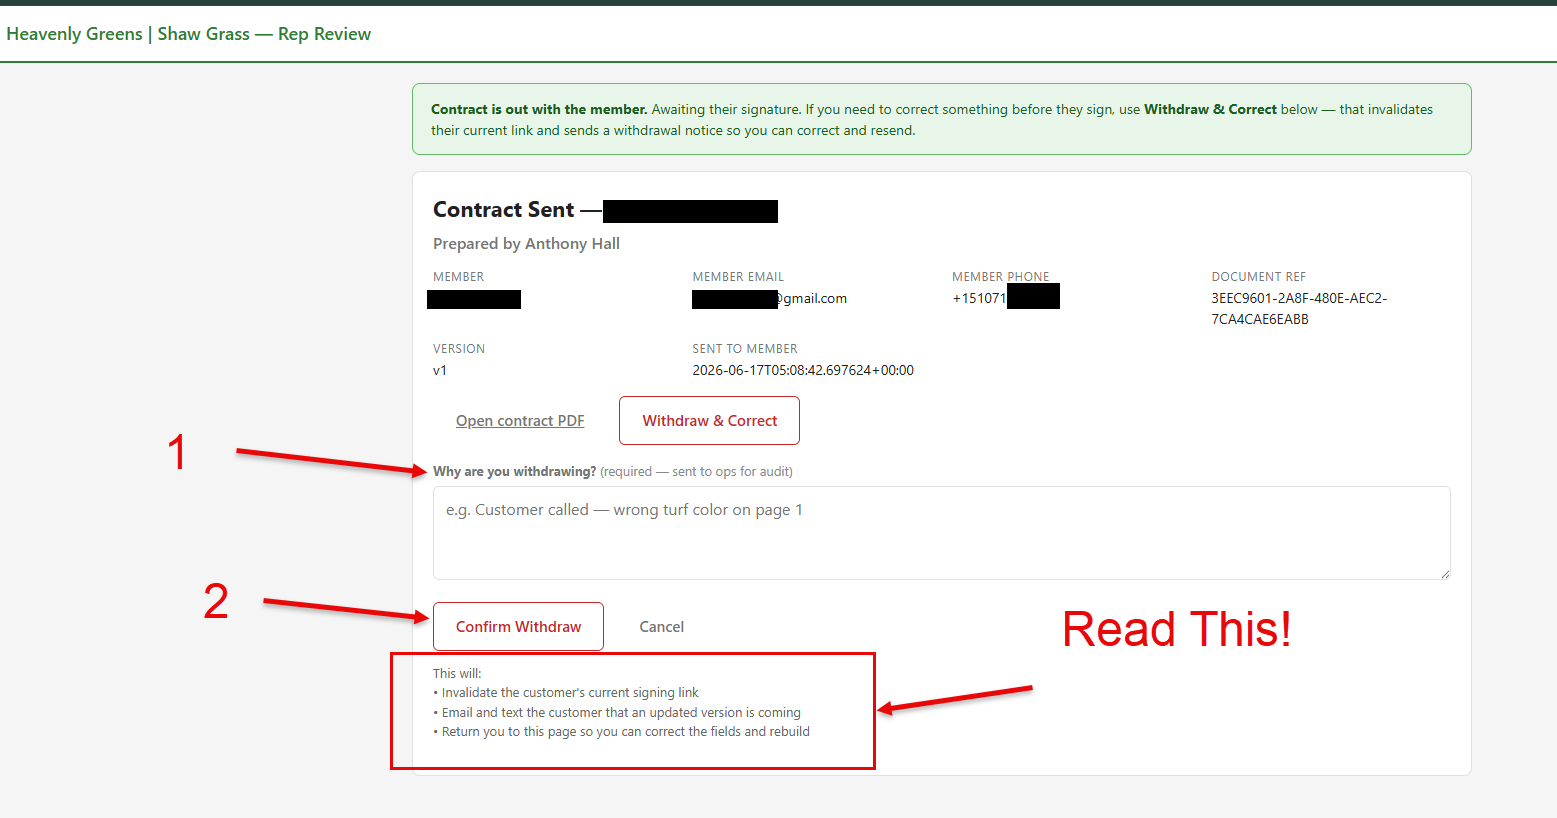
Type why you're withdrawing in the "Why are you withdrawing?" box — it's required and is sent to ops for the audit trail (e.g. "Customer called — wrong turf color on page 1"). Then click Confirm Withdraw.

Know what Confirm Withdraw does — it will:
  • Invalidate the member's current signing link
  • Email and text the member that an updated version is coming
  • Return you to this page so you can correct the fields and rebuild
The withdrawal reason field, Confirm Withdraw button, and the explanation of what withdrawing does

4. Correct and resend

Fix the fields, rebuild the draft, and send the corrected version the same way you sent the first one. The same job number carries through.

Stage 3

Countersigning (Your Turn)

Member signed. You sign. The rest happens on its own.

The three things you do

  1. You get a "Your turn to sign" notification (email + SMS)
  2. Open the link and sign all dealer fields
  3. Done — signed PDF, AGM opportunity advance, customer delivery, and office delivery all happen automatically

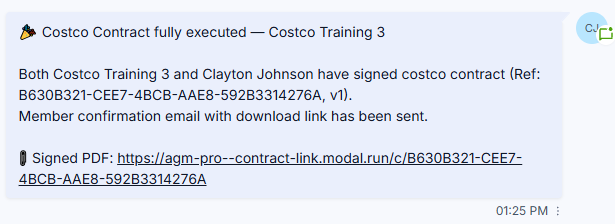
1. Notification the member has signed

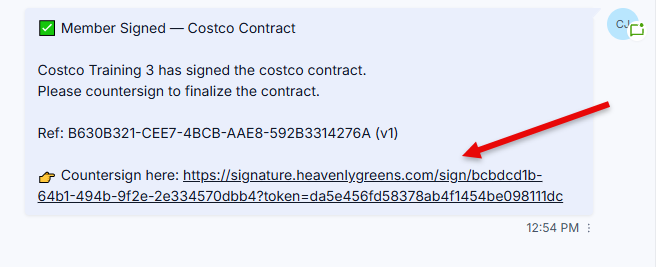
You'll get an email and SMS within seconds of the member completing their signatures. A confirmation message also lands in the contact's AGM conversation window. Open your link.

Confirmation message in the AGM conversation after the member signs

2. Sign as the Heavenly Greens representative

If you don't sign within a day: The system will nudge you. An email reminder lands at the 1-hour mark, again at 24 hours, again at 32 hours. At 48 hours unsigned, the office gets a Slack alert. Don't let it get there.

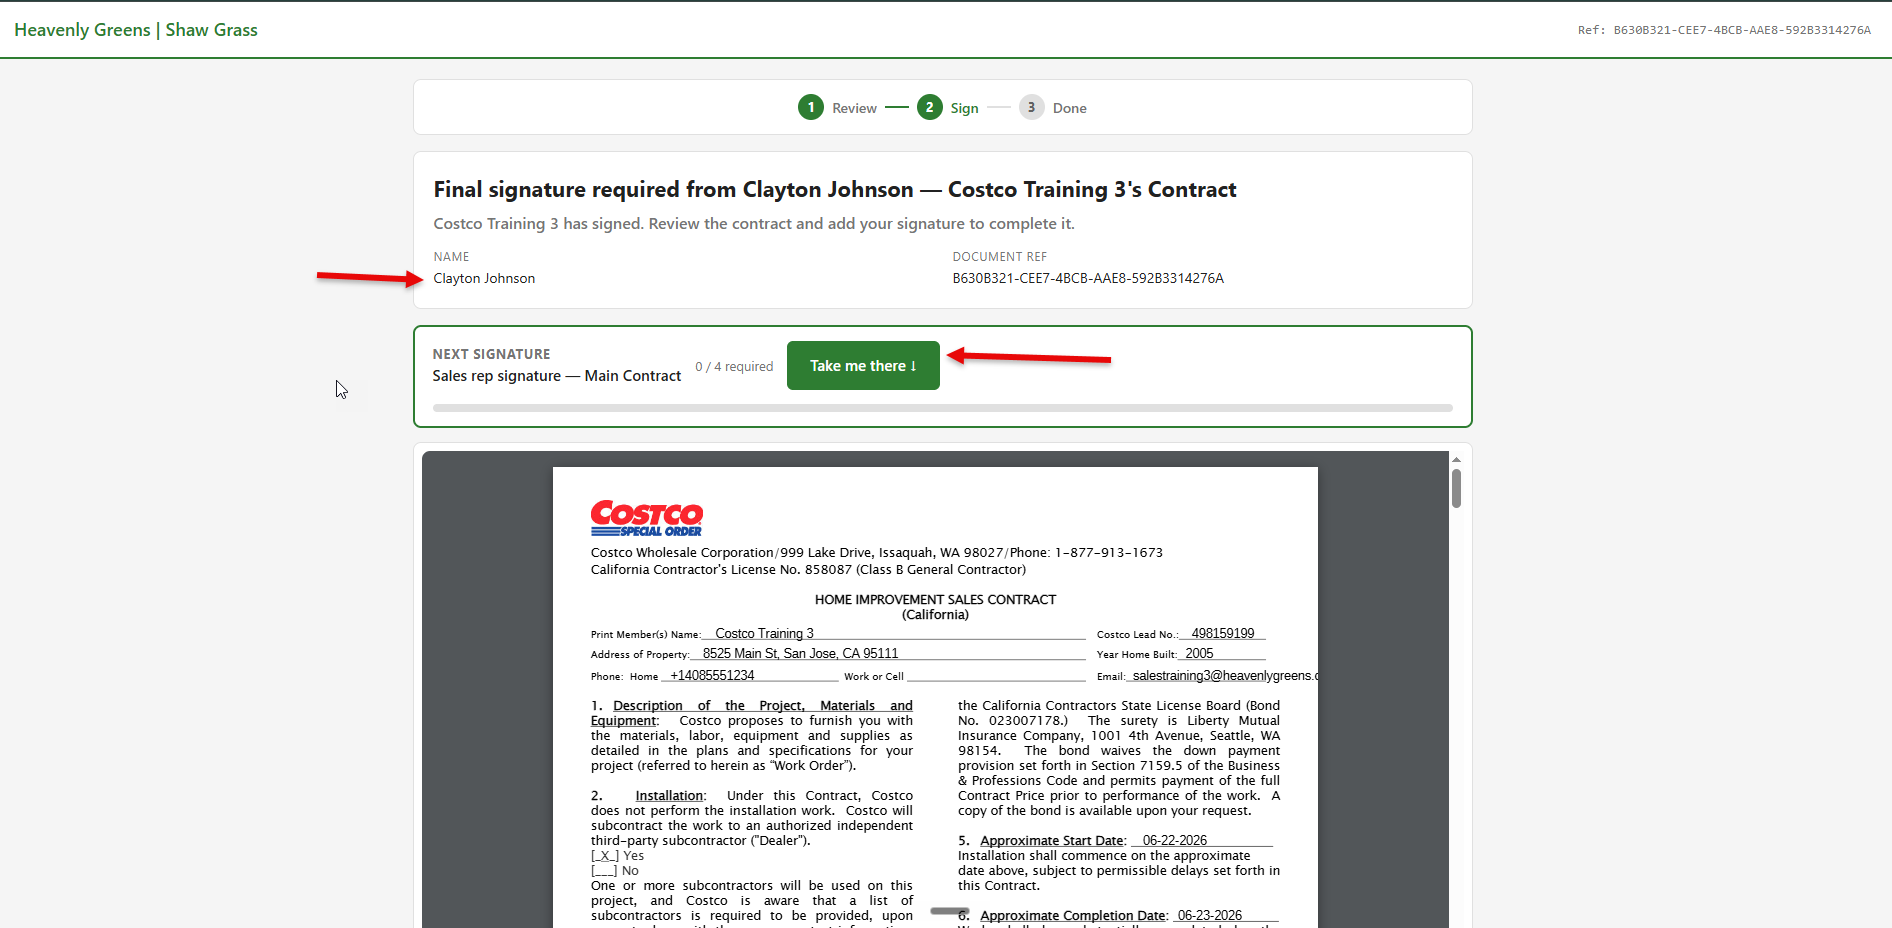
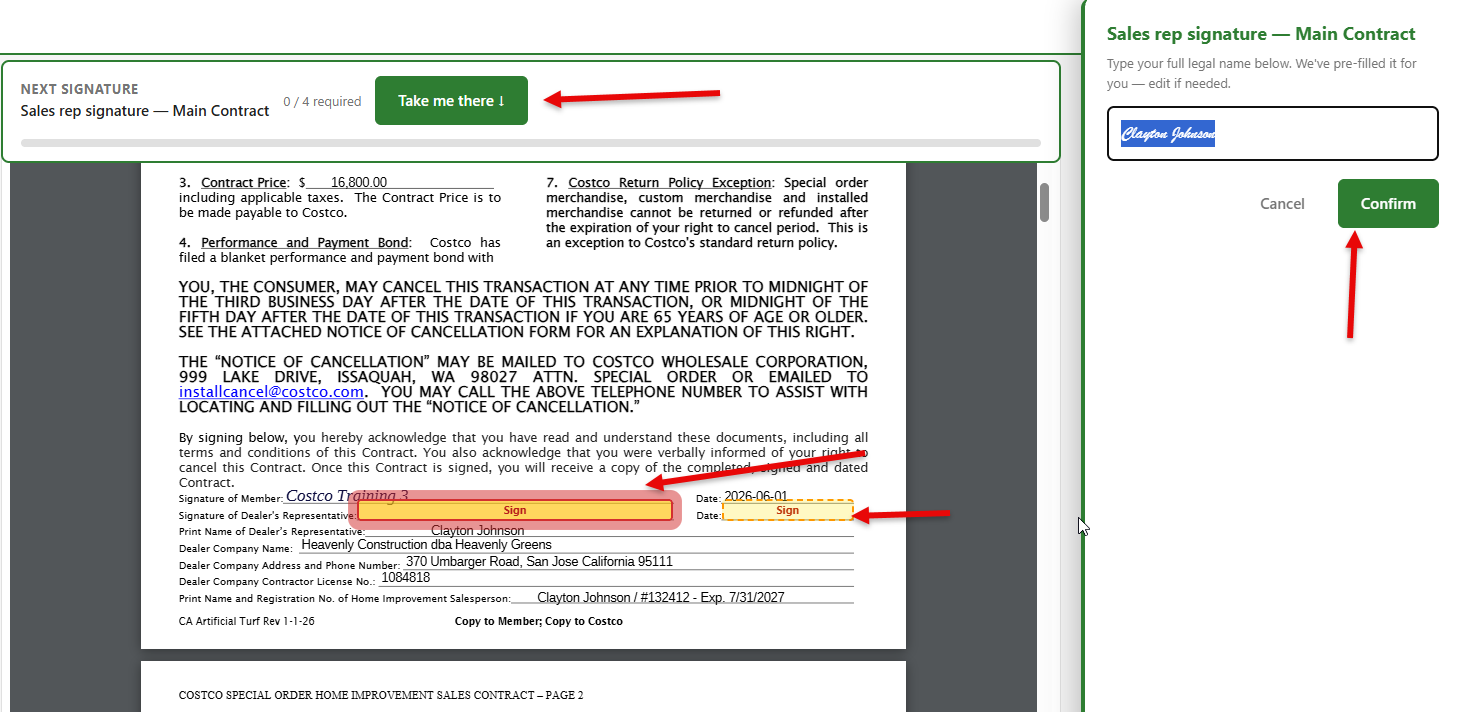
Confirm names, then click Take Me There

Click Take Me There to start filling in your four required fields. Before you begin, confirm your name as the sales rep and the member's name are both correct on the contract.

Rep confirms names and clicks Take Me There to begin signing

Sign each field, then Confirm

Same flow as the member side: Take Me There jumps you to the next field. Click Confirm to populate it with your signature or initial, and the contract advances.

Take Me There guides the rep to the next field with Confirm button

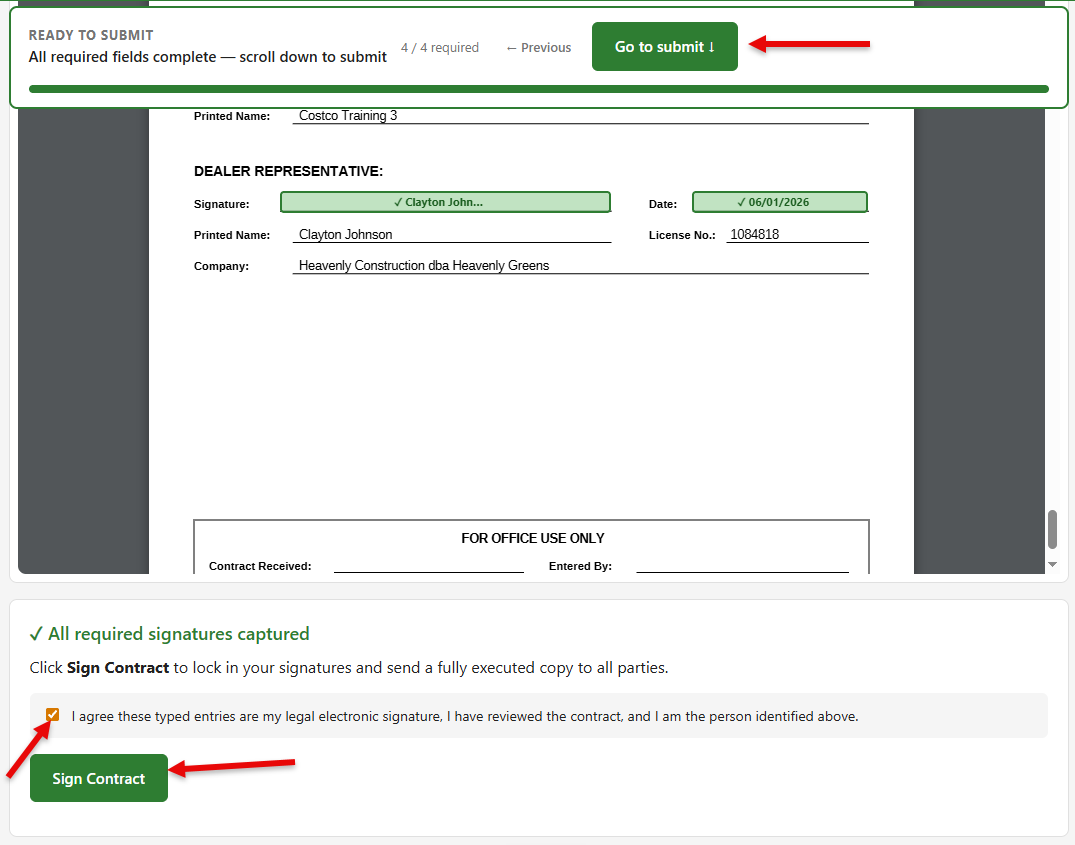
Submit: I agree & Sign Contract

Once all four fields are done, the button changes to Submit. Tick the I agree box and click Sign Contract to complete your countersignature.

Rep submit screen with I agree checkbox and Sign Contract button

Signatures recorded — copies sent

Both signatures are now on file. The signed contract is emailed to the member and to you as the sales rep. A link to the completed contract is also added to the Notes section of the contact in AGM.

Confirmation that signatures are recorded and copies have been sent

3. Done — the system handles the rest

Once you've countersigned, the engine takes over:

  • Re-renders the signed PDF with both signatures + signature certificate
  • Uploads to S3, emails the signed PDF to the member (in their AGM conversation) and to the office
  • Advances the AGM opportunity to Proposal/Contract Approved
  • Adds the contract-signed tag
  • Syncs to Salesforce
  • Posts a Slack alert: "Contract Fully Executed"
Verify it landed: Check the Completed tab in AGM and the member's profile. The signed contract should be visible in both within seconds.

Fully signed — link in the conversation

A confirmation lands in the contact's AGM conversation showing the contract is fully signed, with a link to view the completed contract.

Fully signed confirmation and contract link in the AGM conversation

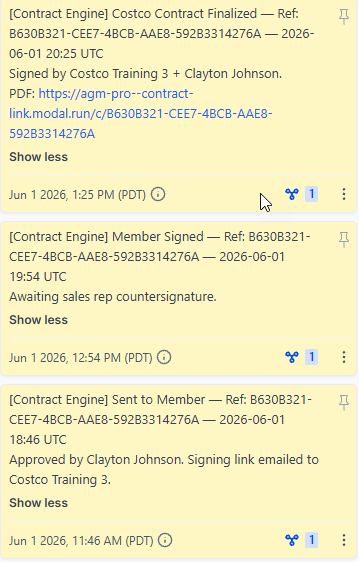
Audit trail in the contact's Notes

The Notes section on the right side of the contact record holds the link to the fully signed contract, alongside notes from earlier stages (contract sent, member signed) for a full reference trail.

Notes section of the AGM contact record showing the signed contract link and earlier stage notes
Stage 4

Building the Installer Packet

The signed contract goes to the office. The installer packet goes to the crew.

The three things you do

  1. Open the Project Documents Uploader for the job
  2. Upload Access Photos, Site Photos, Drawing PDF, Existing Damage, Walkthrough Video — and add notes for each section
  3. Packet rebuilds automatically — a short link goes to the crew

1. Open the Project Documents Uploader

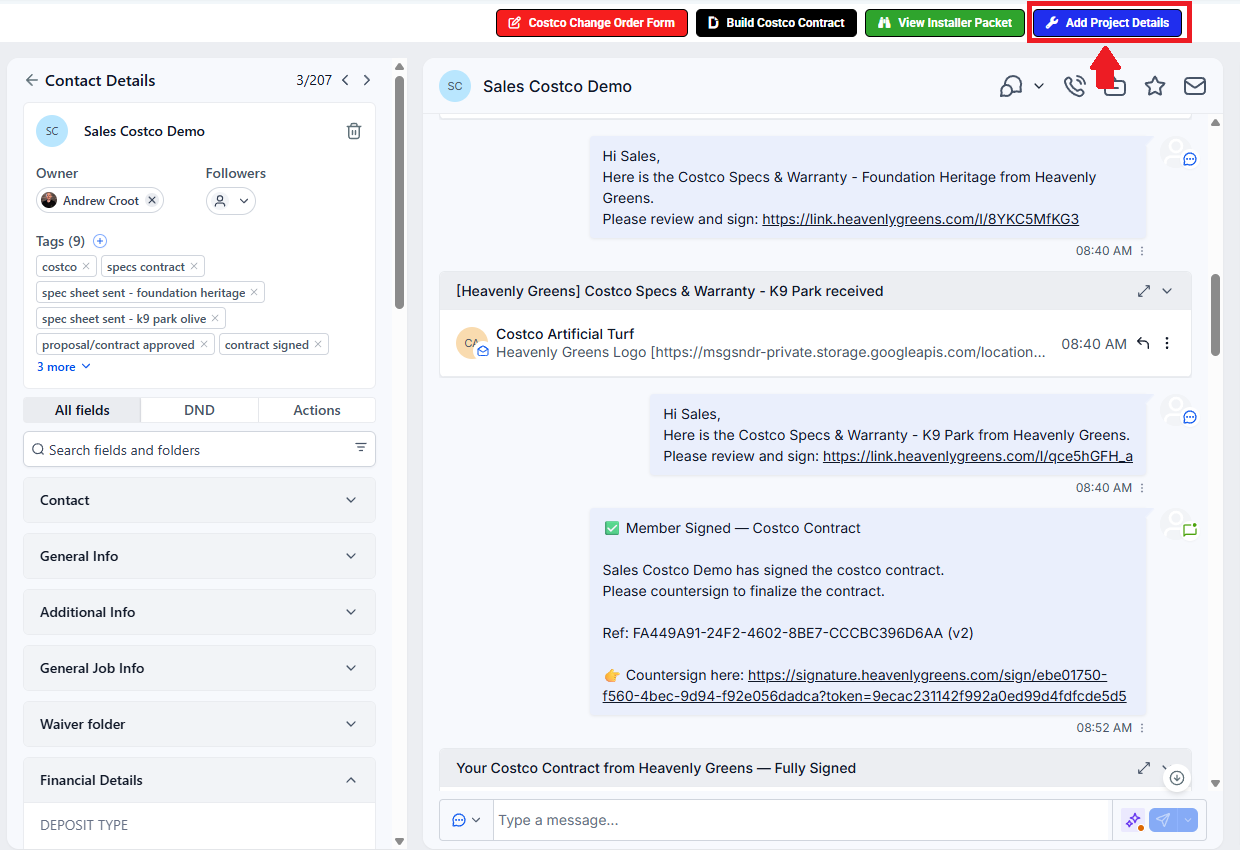
From the contact record, open the Project Documents Uploader link. It's the rep portal that feeds the installer packet directly — what you upload here is what the crew sees on-site.

The uploader is per-job. Each section has its own tiles for drag-and-drop uploads, plus a free-text notes field beneath the tiles.
Opening the Project Documents Uploader

2. Upload media for each section

Seven sections, each with their own tiles and notes field:

  • Access Photos — gate widths, path obstructions, parking situation
  • Site Photos — the existing yard, all angles
  • Drawing PDF — your hand-drawn layout (turf zones, sprinkler heads, drainage notes)
  • Existing Damage — anything pre-installation (cracked patio, broken sprinkler, gopher holes). If there's no visible damage, use the "No Visible Damage" attestation toggle instead of leaving the section blank.
  • Walkthrough Video — a single video walking the property
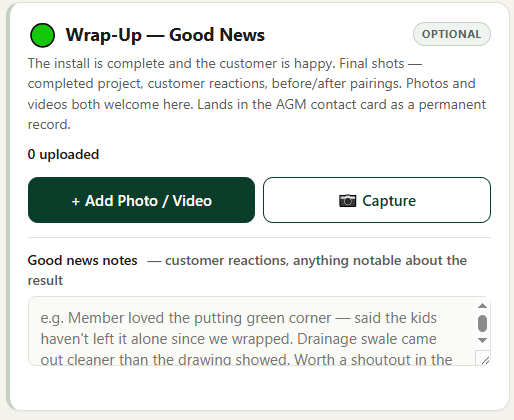
  • Wrap Up Good News (optional, post-installation) — after the install is complete, upload photos and notes capturing what went well: clean finish shots, happy-member moments, anything worth sharing with the team or using as a referral asset.
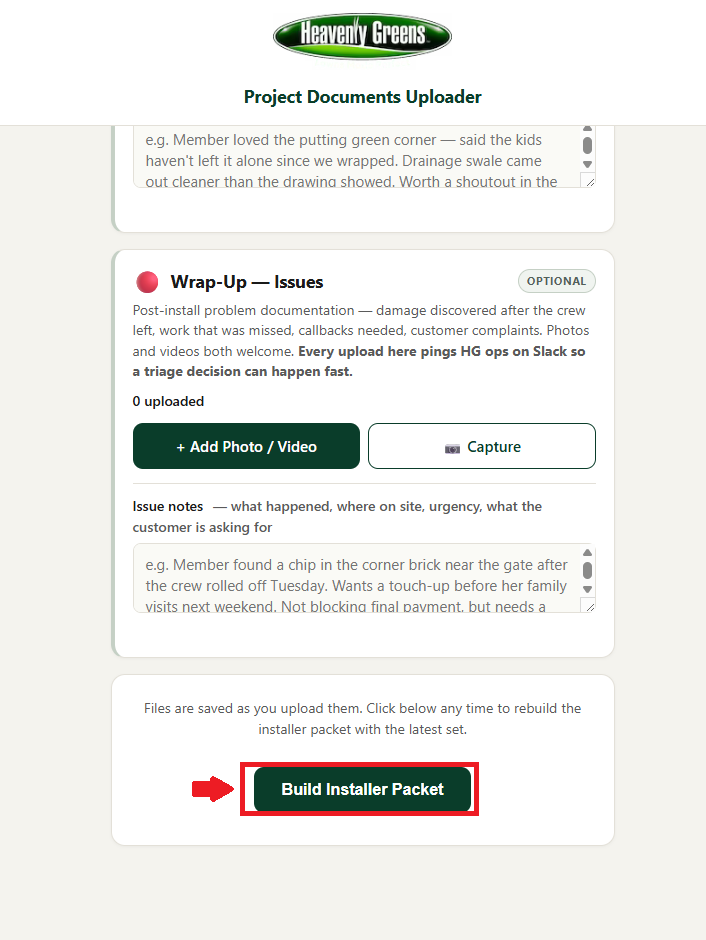
  • Wrap Up Issues (optional, post-installation) — after the install is complete, upload photos and notes for anything that didn't go to plan: install hiccups, accidental damage, items the office or crew needs visibility on for follow-up.
Add notes per section as you upload. The crew sees them printed in the packet under each section header. "Watch the dog at the side gate." "Sprinkler valve is behind the AC unit." This is where job knowledge transfers.
Notes auto-save as you type (blur or after a short pause). You can come back later and edit — they hydrate when you reopen the portal.

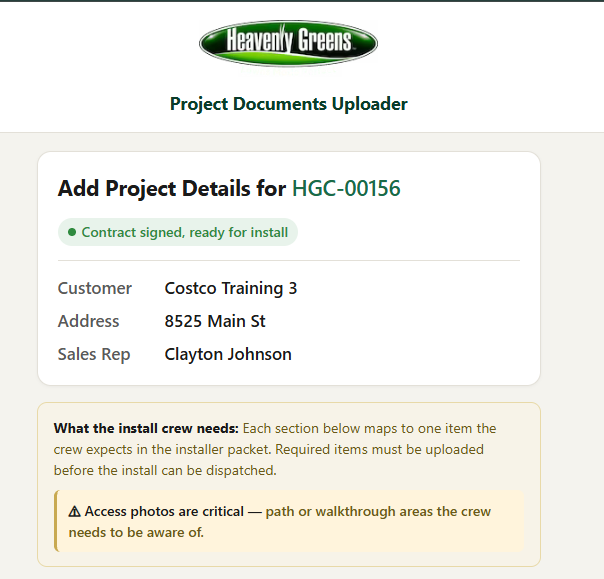
Confirm the job header first

Before you start uploading, confirm the project number, customer name, and address are all correct, and that the sales rep is assigned to you.

Confirm project number, customer name, address, and assigned sales rep

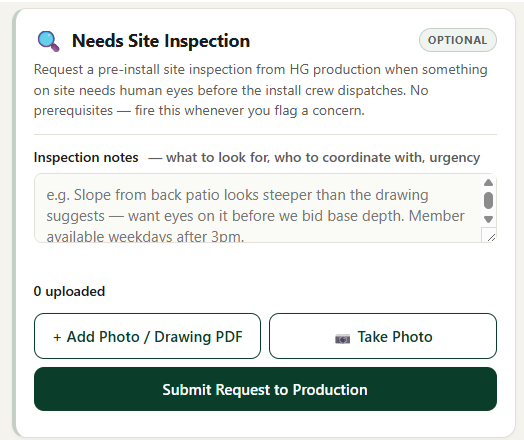
Optional: Need Site Inspection

If a site inspection is needed before installation begins, complete this section. Otherwise, skip it.

Optional Need Site Inspection section in the Project Documents Uploader

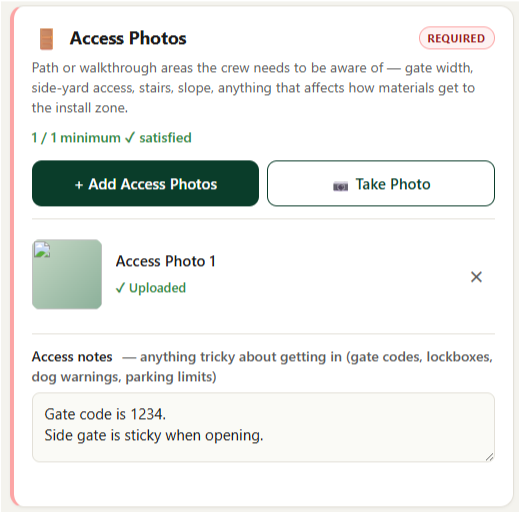
Required: Access Photos

Upload at least one image of the job access areas. Use the notes field for anything photos can't capture — gate codes, parking quirks, dog at the side gate. Add as many photos as needed; upload everything relevant.

Required Access Photos upload section

Required: Site Photos

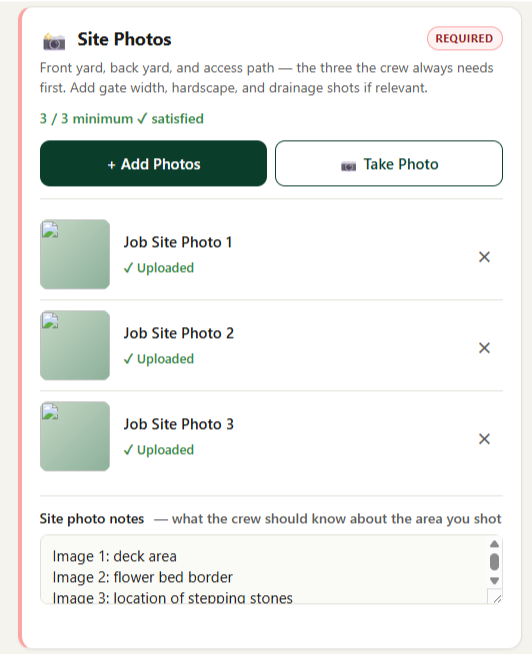
Upload at least three photos showing anything the crew needs for the install — the yard from multiple angles, problem spots, areas that need extra attention. Use the notes field to flag specifics tied to each image so the crew knows what they're looking at.

Required Site Photos upload section

Required: Drawing PDF

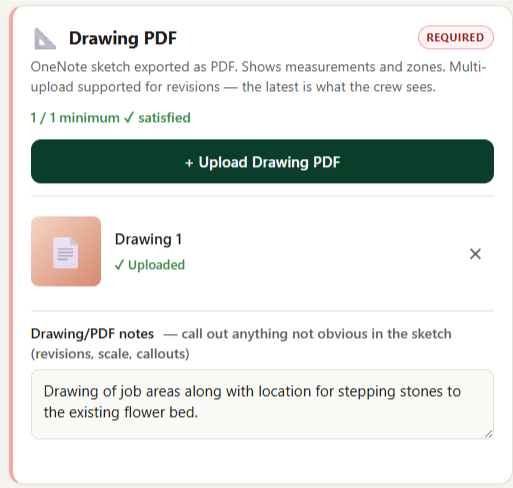
Create the drawing in OneNote as you normally would, then upload the whole PDF as a single file. Don't skip the notes — anything that needs to be called out specifically about the drawing belongs there.

Required Drawing PDF upload section

Required: Existing Damage

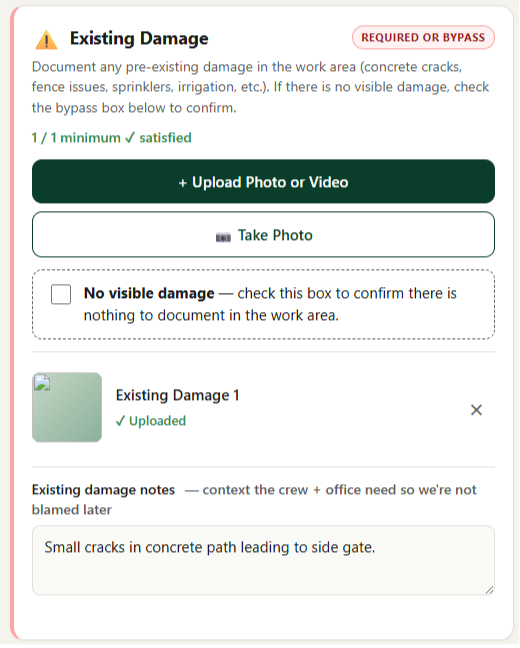
Upload at least one image of any pre-installation damage. Use the notes field to call out anything that isn't clearly visible in the photo. If there's no damage, check the No Visible Damage box to confirm — don't leave the section blank.

Required Existing Damage upload section with No Visible Damage toggle

Optional: Walkthrough Video

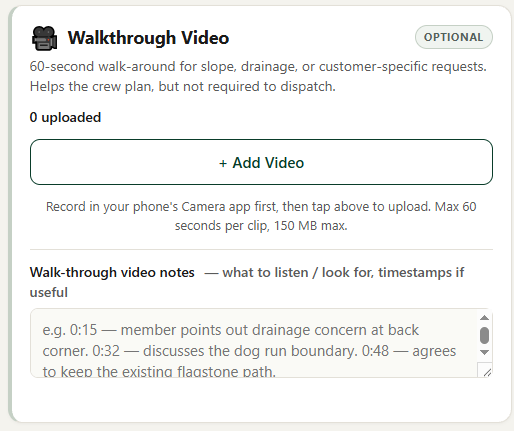
Up to 60 seconds — aim for under 55 to make sure it's accepted. Shoot vertical or horizontal depending on what you're capturing. Use the notes field to describe different parts of the video so the crew can navigate it.

Optional Walkthrough Video upload section

Optional: Wrap Up Good News

Post-installation only. Upload images and notes capturing anything that went well on the job — clean finish shots, happy-member moments, anything worth sharing.

Optional Wrap Up Good News post-installation section

Wrap Up Issues, then Build Installer Packet

Wrap Up Issues is optional and post-installation — use it when there are installation issues that need attention, with detailed notes about what happened and how urgent it is. Once every section is complete, click the Build Installer Packet button at the bottom to submit.

Wrap Up Issues section and Build Installer Packet submit button

3. The packet rebuilds itself

You don't trigger a build. The engine watches for new media or notes and rebuilds the installer packet automatically. The crew gets a short URL they can text to themselves, and tapping any video link opens a fresh, presigned stream — no expired links.

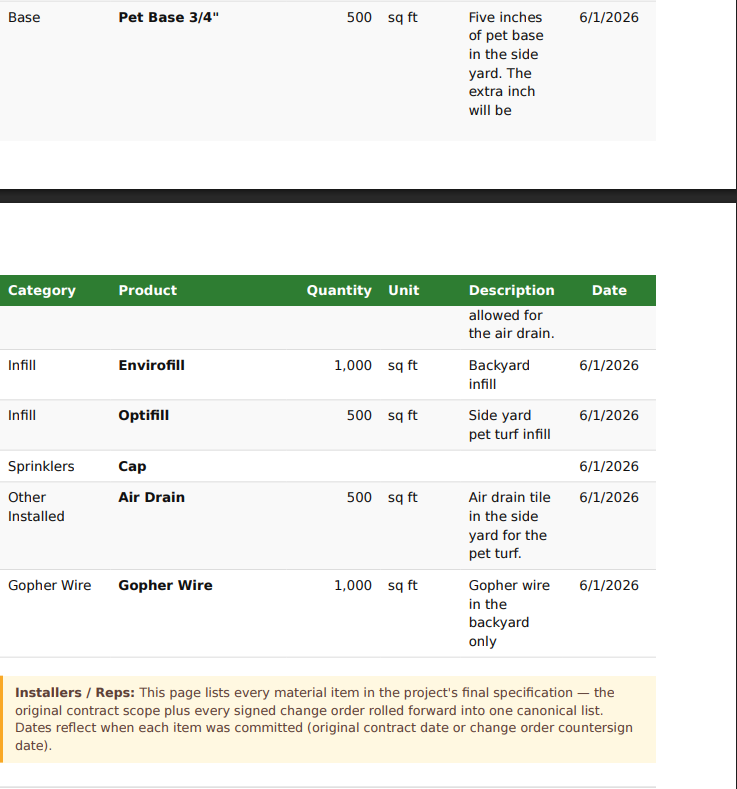
What's in the packet: a PII-stripped work order page, attachments index, revised material spec page if any change orders exist, every uploaded photo classified and laid out (portrait, landscape, panorama), per-section rep notes, embedded PDFs, and a clickable video index. Any change order updates the packet too — so the crew always has the latest.

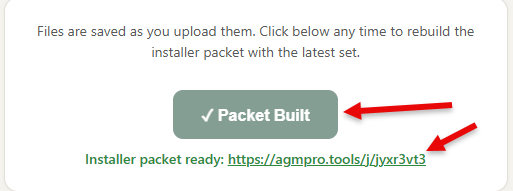
Packet built — link ready

After you click Build Installer Packet, this confirmation appears with a clickable link. Tap it to view the completed packet.

Confirmation message with clickable link to the completed installer packet

Packet link saved to the contact

A note is added to the contact record with a link to the installer packet, so you can pull it up any time.

Note added to the contact record with link to the installer packet

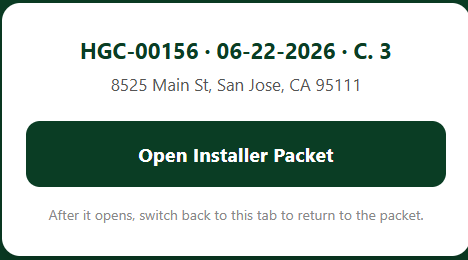
Open Installer Packet — fresh PDF

Clicking the link (or the button in the contact record) opens this page in a new tab. Click Open Installer Packet to generate the most up-to-date version — the PDF renders in another new tab.

Open Installer Packet button that generates the latest packet PDF

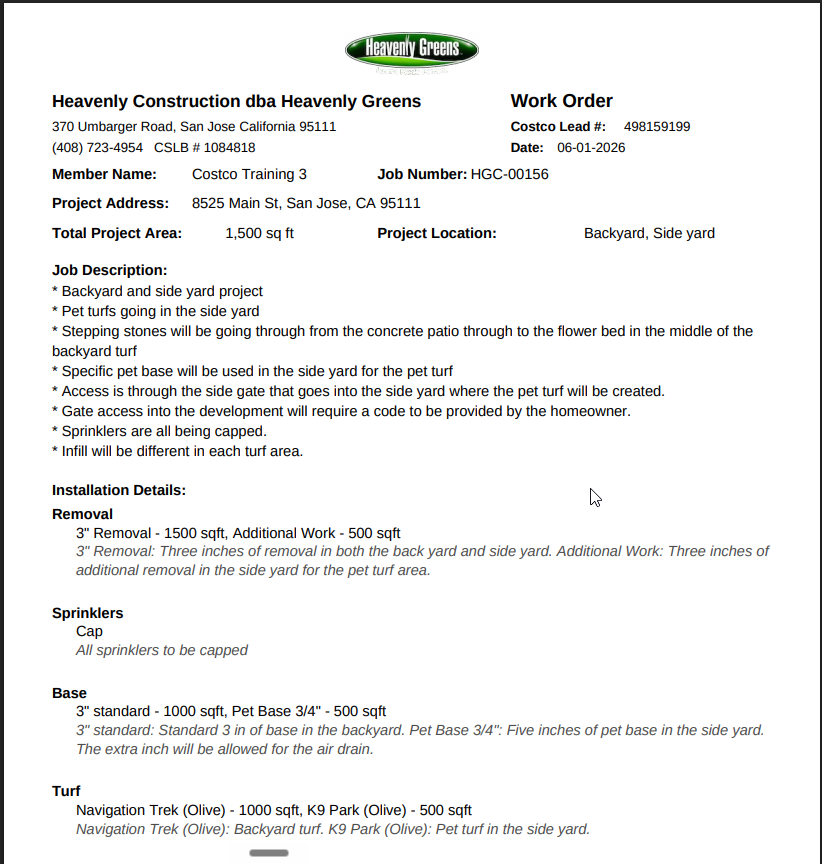
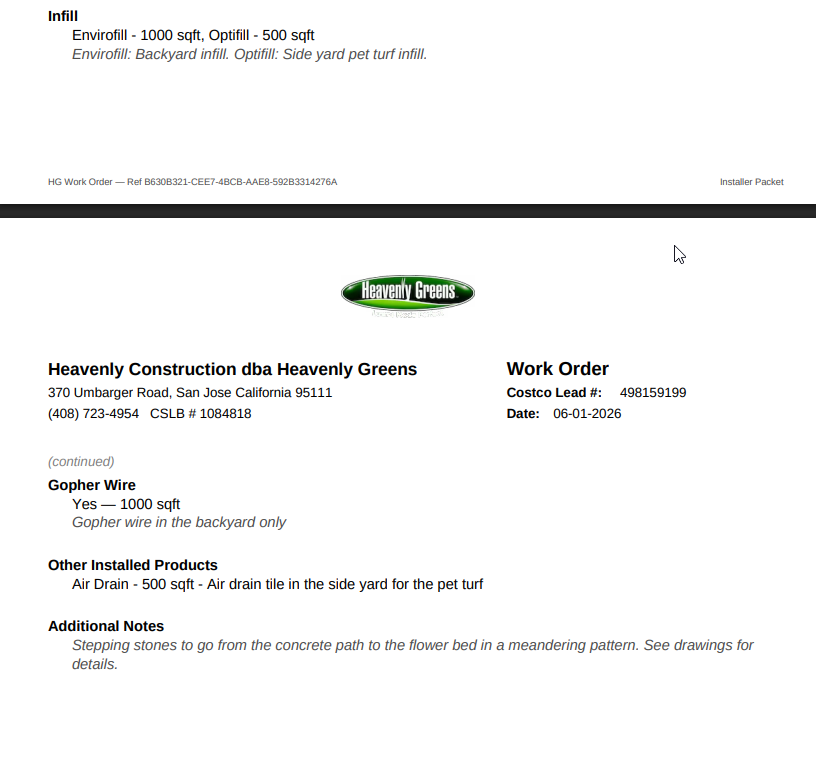
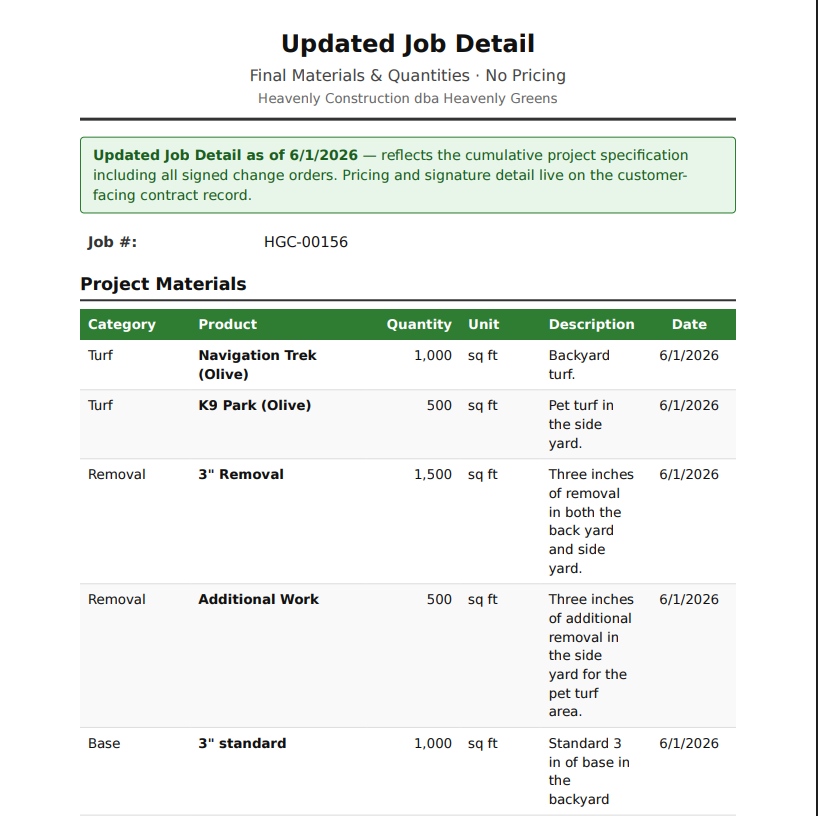
Inside the packet: work order bookends, everything else in between

The packet opens and closes with the work order and updated job detail — those are the bookend pages. Between them sits everything the crew needs for the install: uploaded photos, drawings, walkthrough video link, notes, and any wrap-up content.

First page of the installer packet — work order and job detail
Installer packet body — uploaded media and notes
Last page of the installer packet — work order and job detail
Stage 5

Completing a Change Order

Scope changed after signing? Don't void the contract. File a Change Order.

The five things you do

  1. Open the contact → click "Create Change Order"
  2. Enter the reason + line items (Add / Remove / Modify)
  3. Submit — the CO draft is built automatically
  4. Review the CO draft → approve
  5. Member signs → you countersign. The installer packet auto-updates.
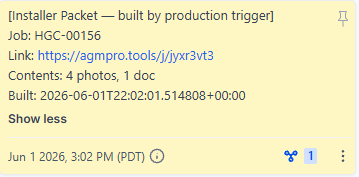
When to create a Change Order

The member has signed, but something changed: they want more turf, different edging, an extra removal area, a sprinkler tweak. Don't void the original contract. Create a Change Order instead.

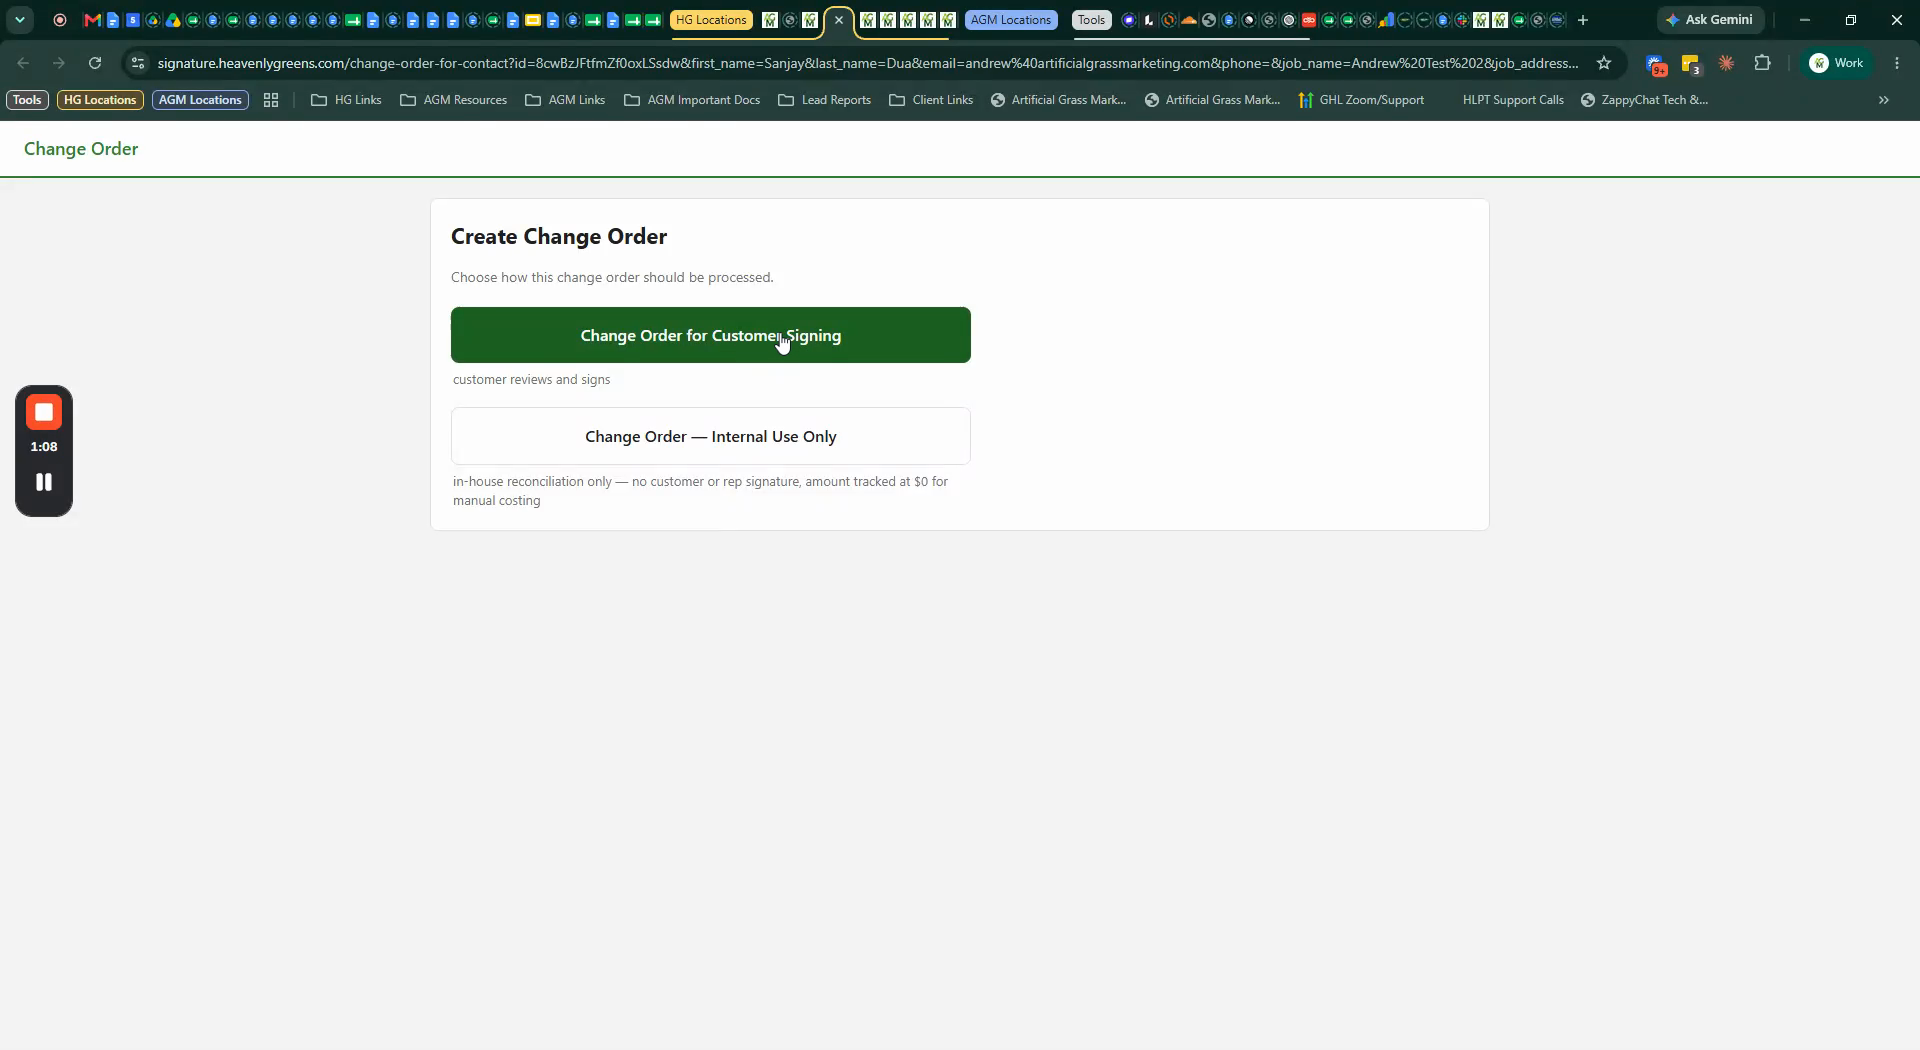
1. Open the form

From the member's Contact record, click "Create Change Order" — it sits next to the original Contract Form button.

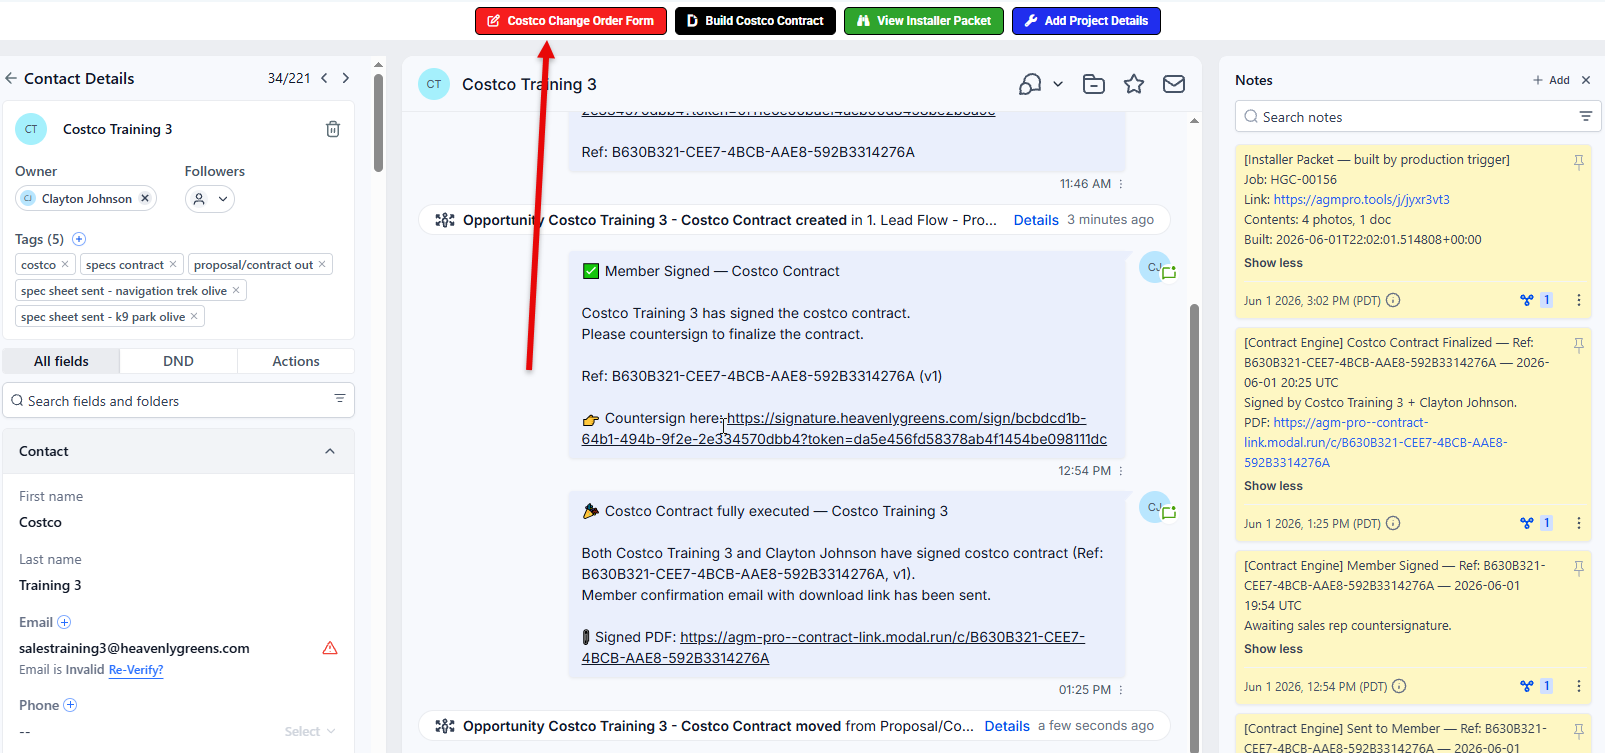
Open the Costco Change Order form

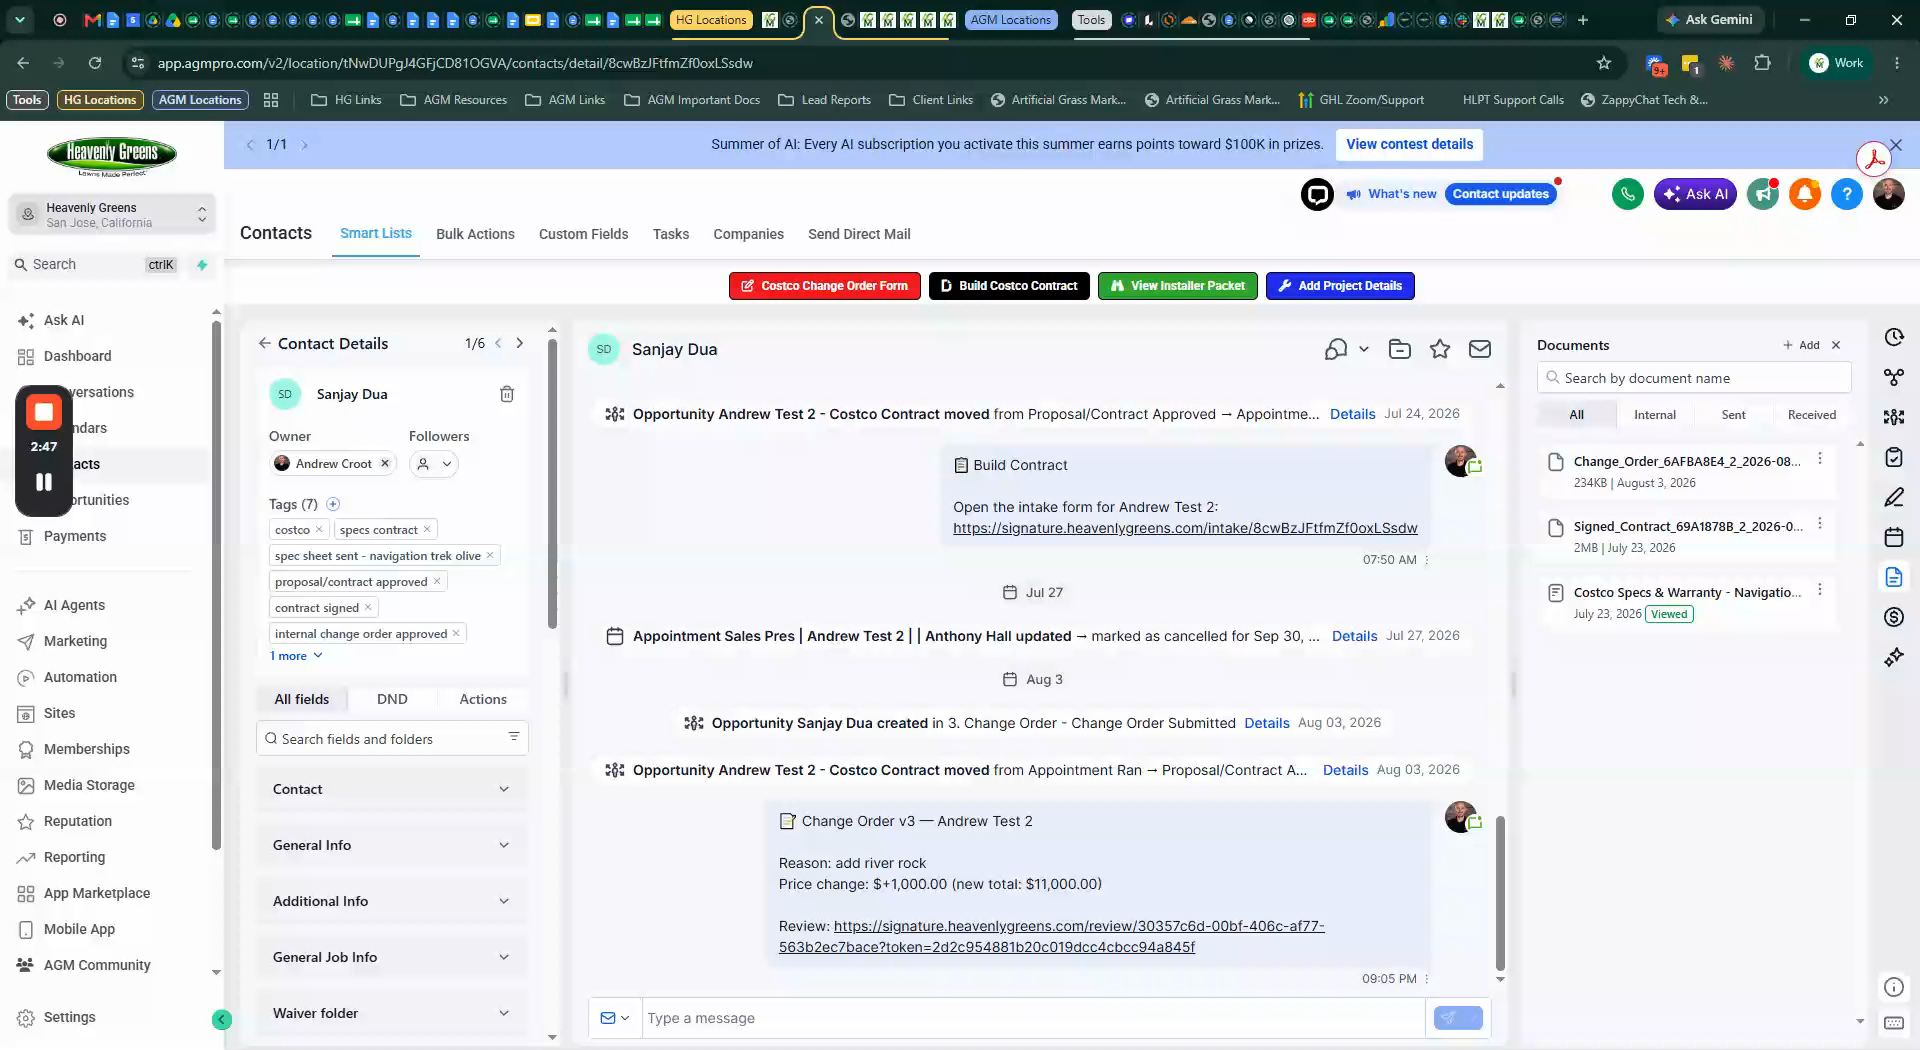
Click the red Costco Change Order Form button in the contact record to open the form.

Red Costco Change Order Form button in the contact record

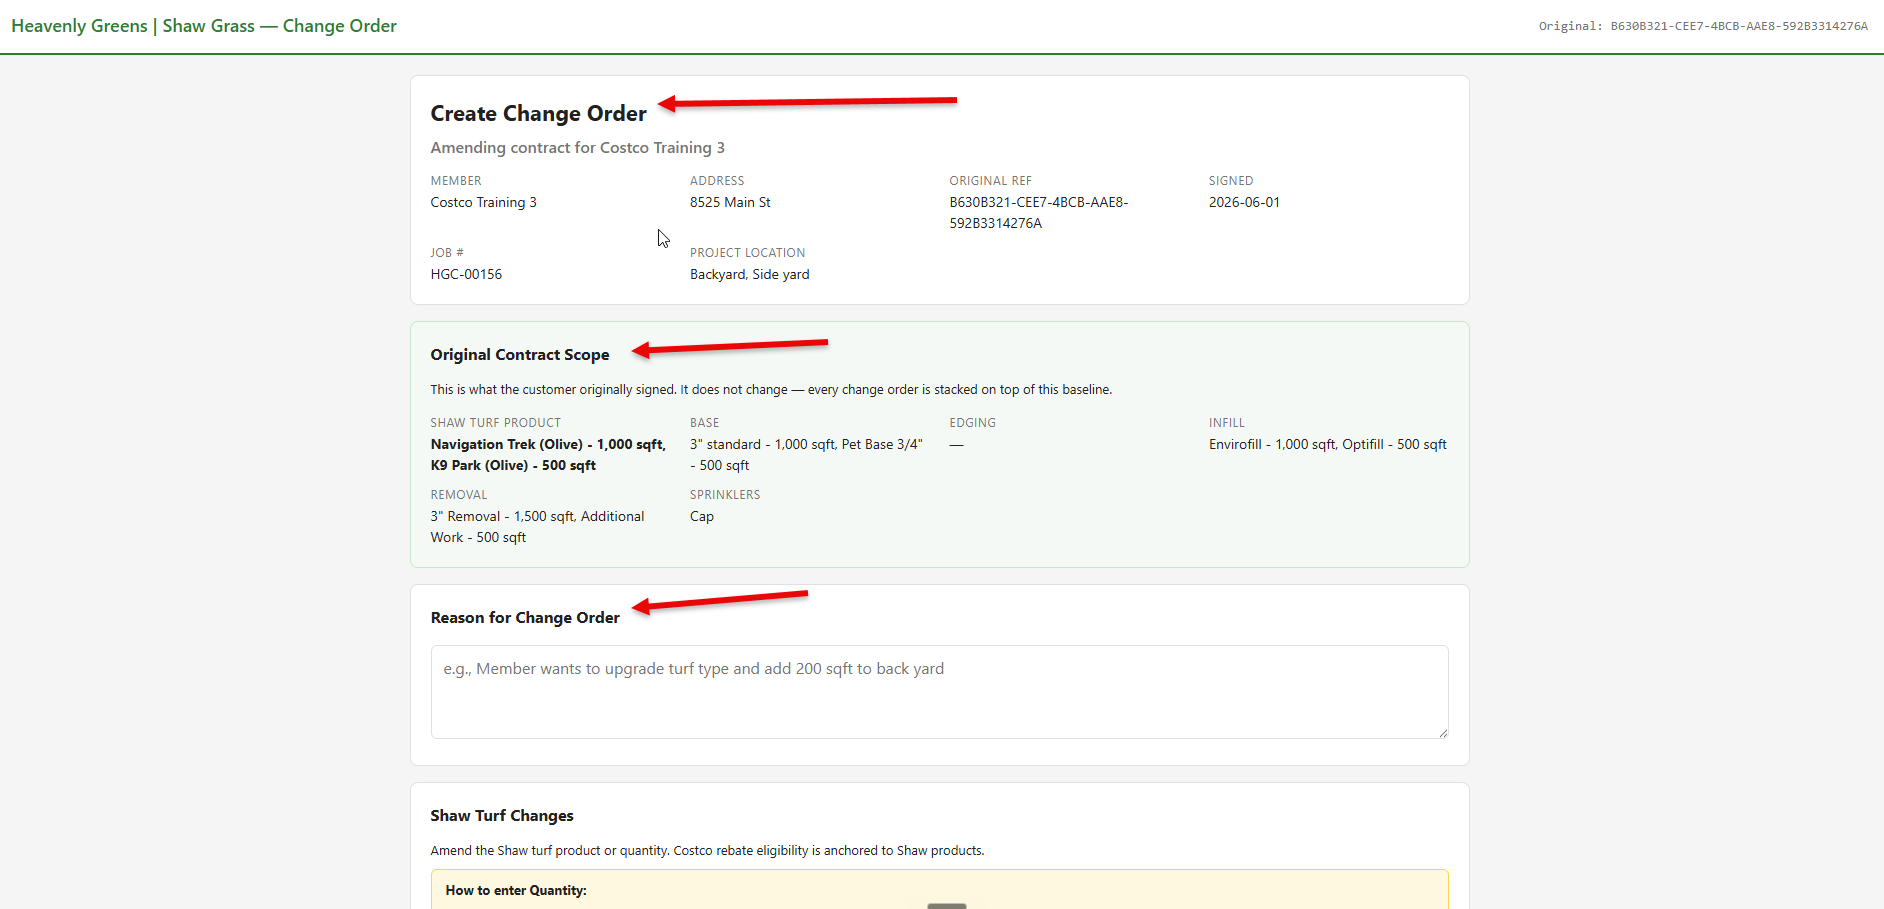
Review customer + original scope, then add the reason

Check the first two sections: the customer data, and the original scope of the contract (the products on the signed deal). Then enter the reason for the change order in the text box below them.

Change Order form showing customer data, original contract scope, and reason text box

2. Enter the line items

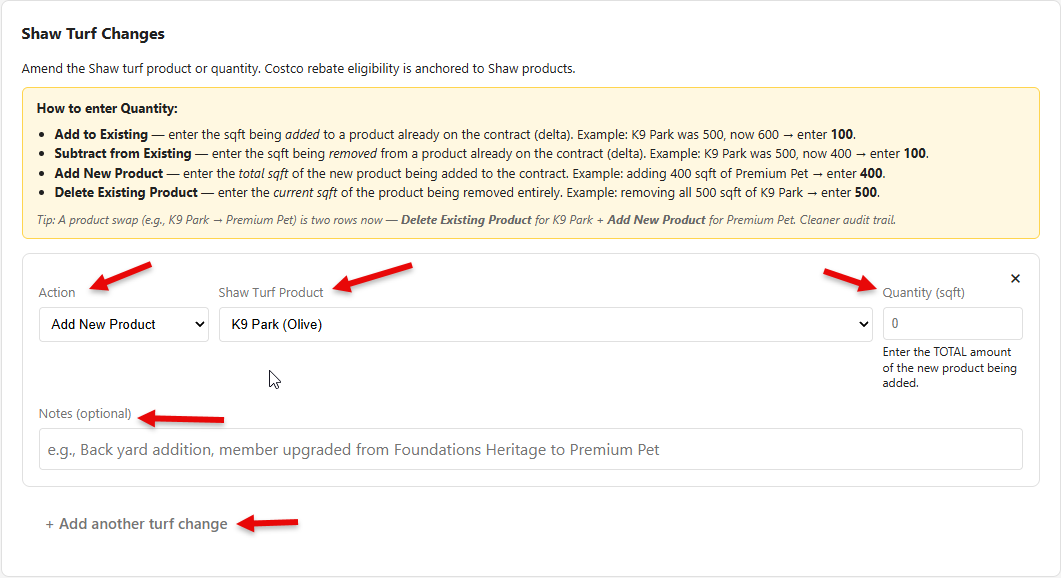
Each row is one change. For each row:

  • Action — one of four:
    • Add to Existing — add to a product already on the contract (delta only, not the new total)
    • Subtract from Existing — remove from a product already on the contract (delta only)
    • Add New Product — total amount of a brand-new product being added
    • Delete Existing Product — current amount of the product being removed entirely
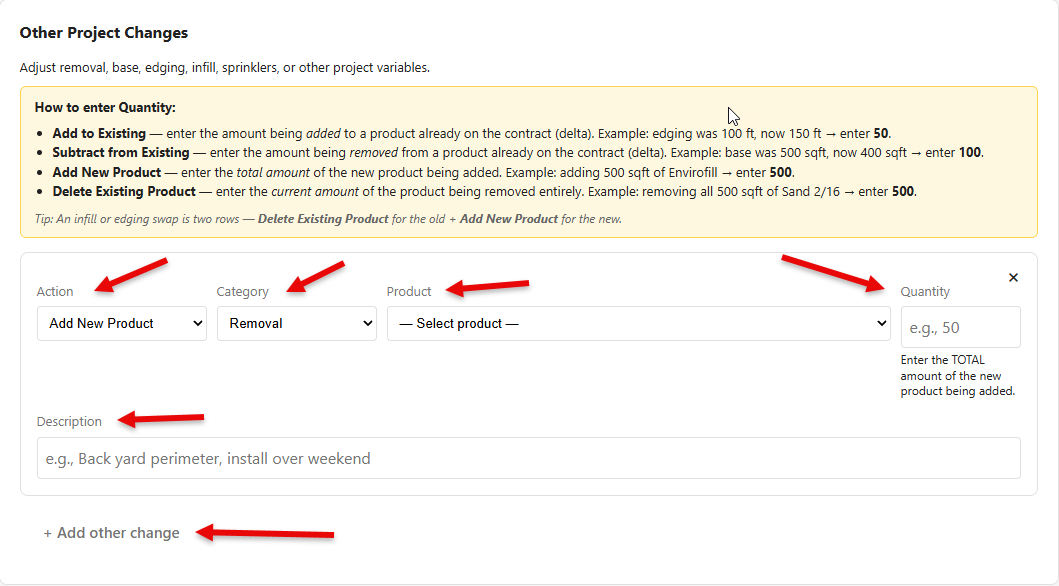
  • Category — the form is split into two sections. Use Shaw Turf Changes for the turf product itself (Costco rebate eligibility is anchored to Shaw), or Other Project Changes for removal, edging, base, infill, sprinklers, and other project variables. Pick the product from the appropriate section.
  • Quantity — sqft (or linear feet for edging). No unit price — that goes in the single Change Order Pricing field below.
  • Description / Notes — what specifically changed (e.g. "K9 Park Olive — backyard extension")
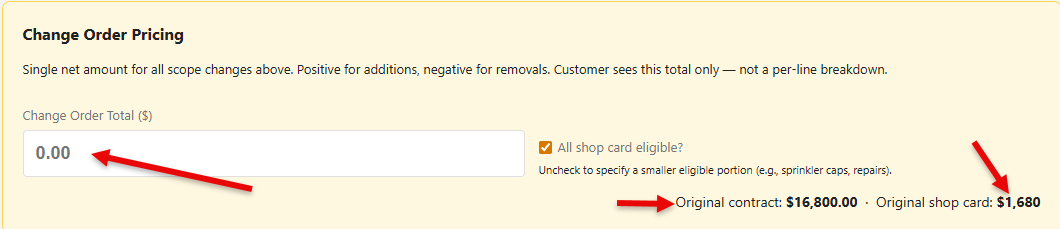
  • Change Order Pricing — at the bottom of the form, enter the single net price difference for the whole change order (positive for additions, negative for removals). The customer sees this one total — not a per-line breakdown.
A product swap (e.g. K9 Park → Premium Pet) is two rows: Delete Existing Product for the old + Add New Product for the new. Cleaner audit trail than trying to "modify" in place.

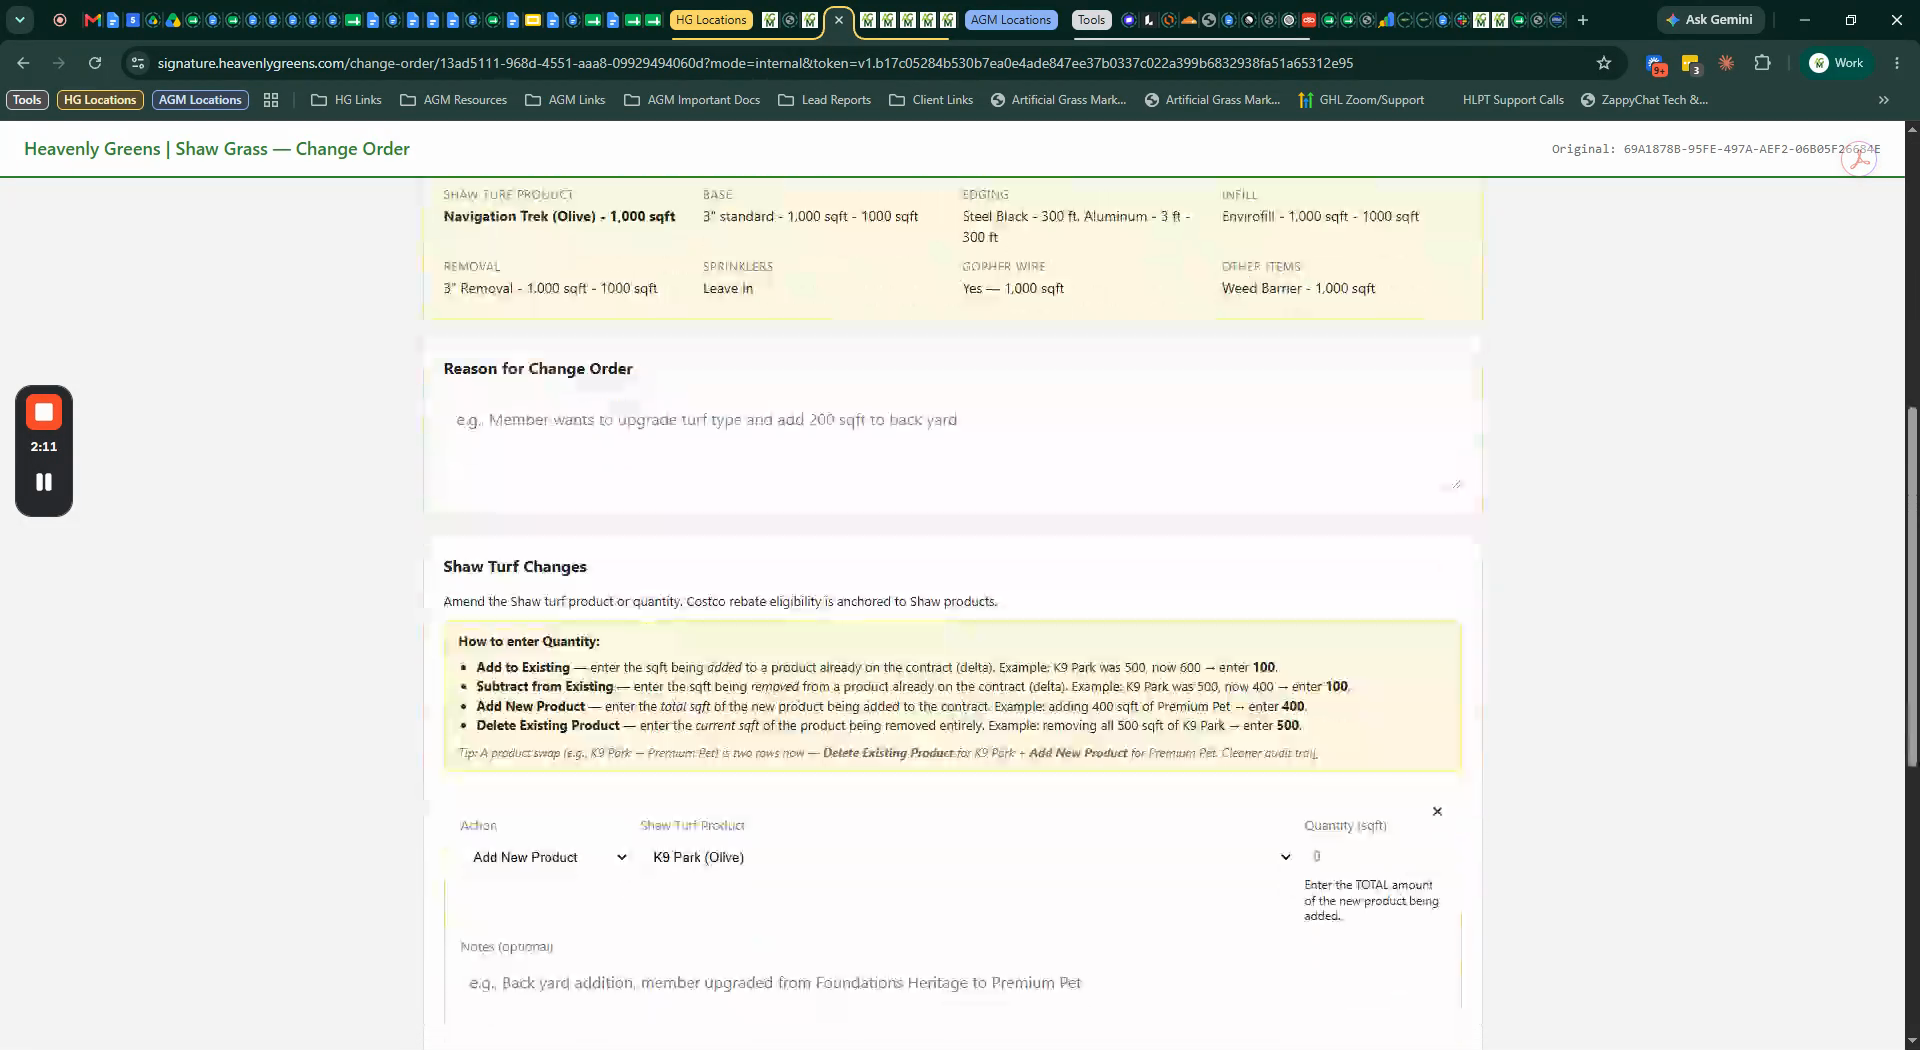
Shaw Turf Changes: enter, add more, delete

Read the How to enter Quantity box at the top before you fill anything in — it tells you which Action goes with which number. Add notes as needed. Click + Add another turf change to add another row, or hit the X at the top right of a row to remove it.

Shaw Turf Changes section with How to enter Quantity instructions and a row to fill in

Other Project Changes: same pattern

Same drill: read the How to enter Quantity box, fill in the row, add a description. Click + Add other change to add another row, or hit the X at the top right to delete a row you don't need.

Other Project Changes section with How to enter Quantity instructions and a row to fill in

Change Order Pricing: enter the net total

Enter the full change order total — positive if products are being added, negative if products are being taken away. The system uses this to calculate the new contract amount and the updated shop card amount.

Change Order Pricing field for net total with original contract and shop card amounts shown

3. Submit

The engine loads the original signed contract, applies your line item deltas, calculates revised totals and shop card, and assembles a one-page Change Order PDF.

What the member sees on the PDF:
  • Original contract amount (read-only header)
  • Any prior change orders on this job (cumulative)
  • The new change order items and the new total
Same job number (HGC-XXXXX) carries through. Each CO gets its own version (v2, v3, etc.).

Click Create Change Order to build the draft

Once all the information is added, click the green Create Change Order button to build the draft for review.

Green Create Change Order submit button at the bottom of the form

4. Review the CO draft → approve

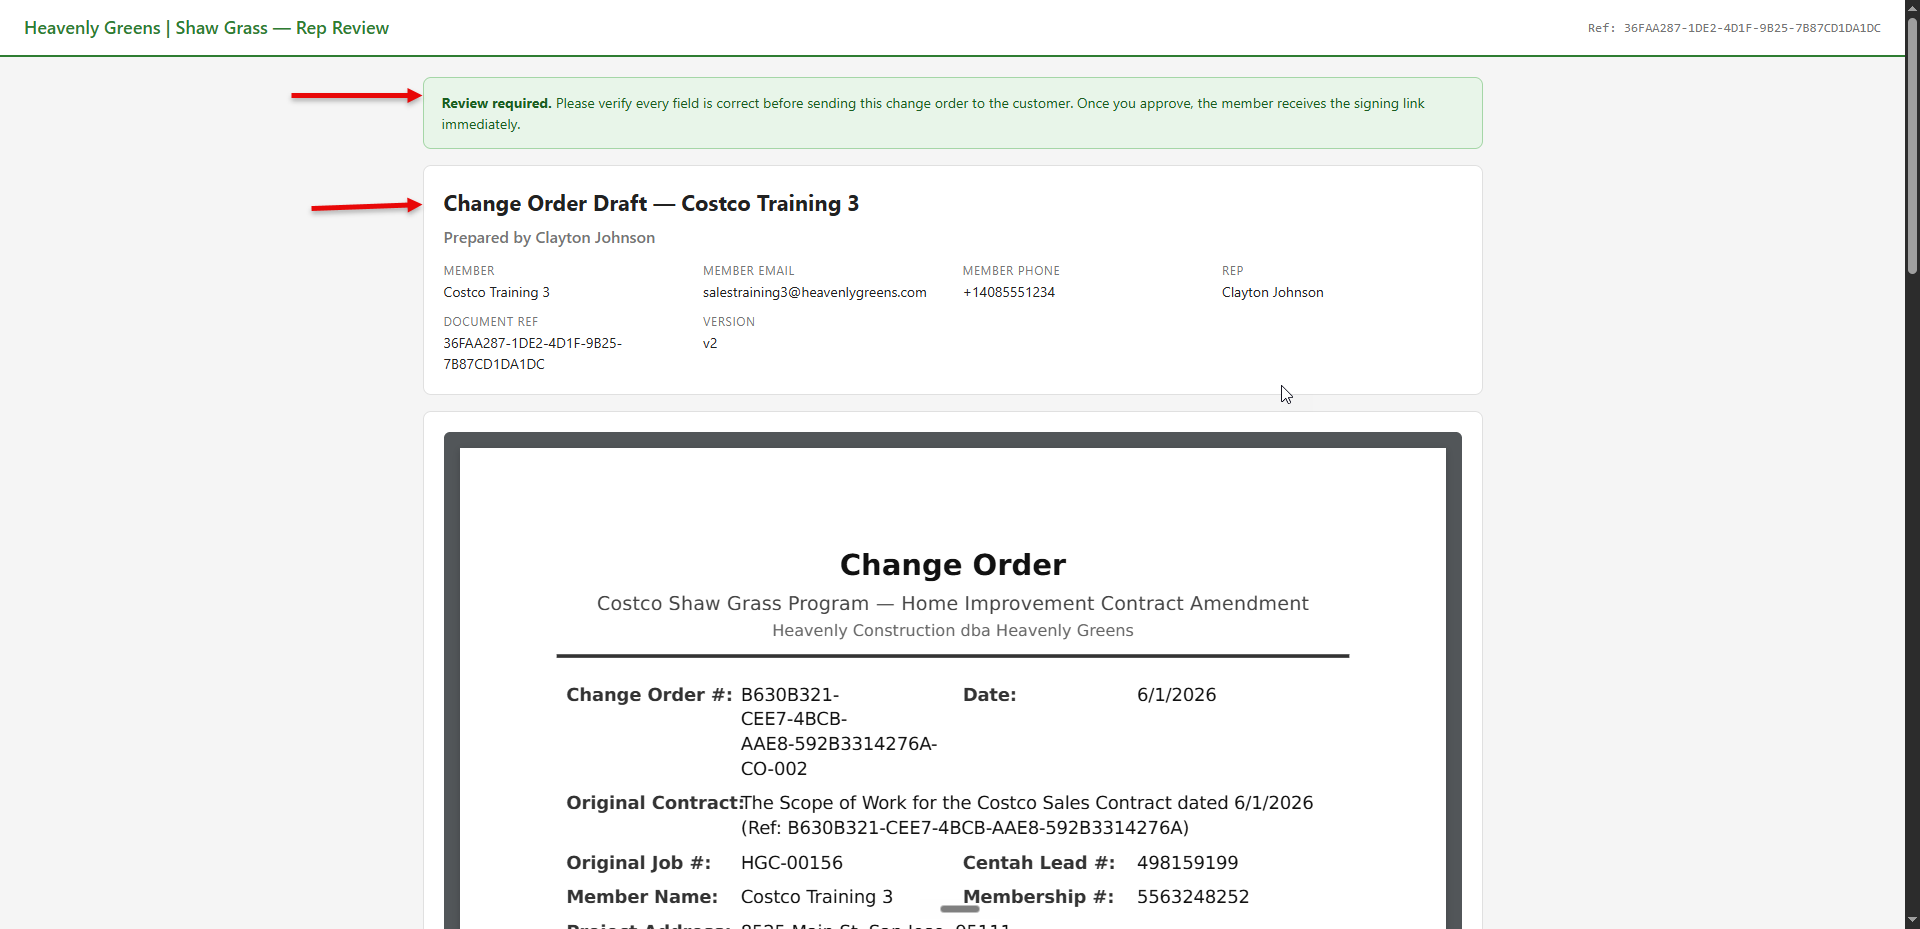
Same draft-review gate as the original contract. The CO is one page, four signing fields (member sig + date, dealer sig + date). Check the math, check the description, then approve.

Confirm: right customer

Check that the draft you're reviewing is for the right customer's contact information before going any further.

Customer information header on the change order draft

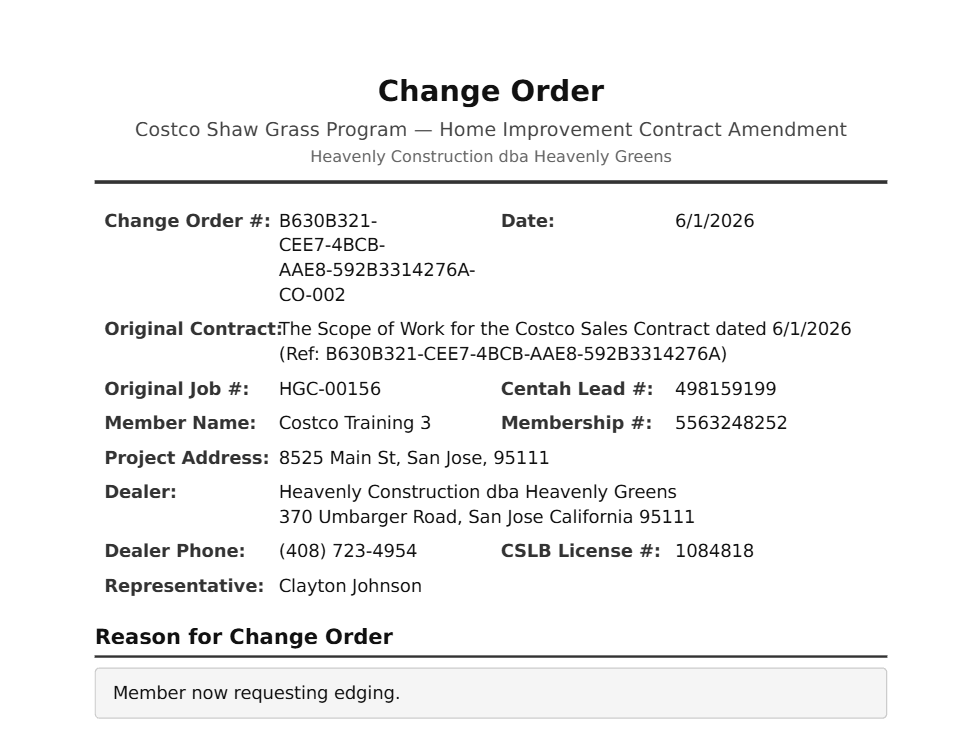
Confirm: change order info is right

Confirm the change order has all the information filled in correctly, including the reason for the change order.

Change order details and reason on the draft

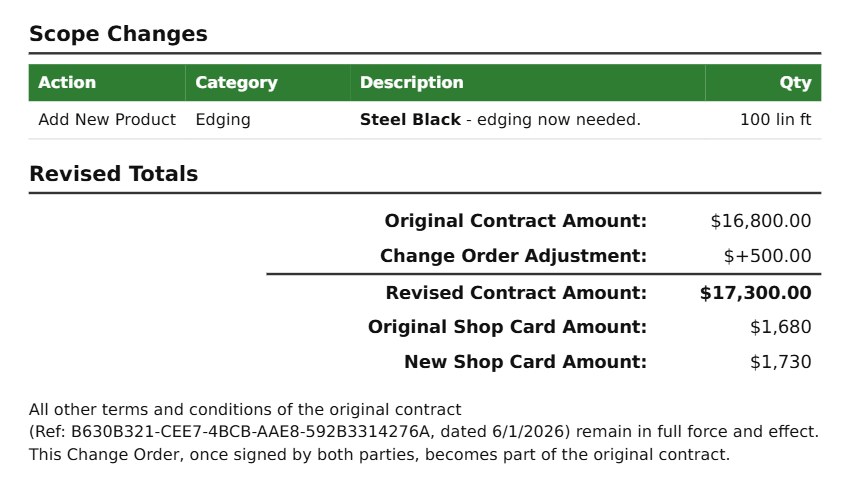
Scope changes: confirm products and totals

Confirm the product updates are correct, including quantities. The totals section shows:

  • Original contract amount
  • Change order adjustment (positive or negative)
  • Revised contract amount
  • Original and new shop card amounts
Scope changes and totals breakdown on the change order draft

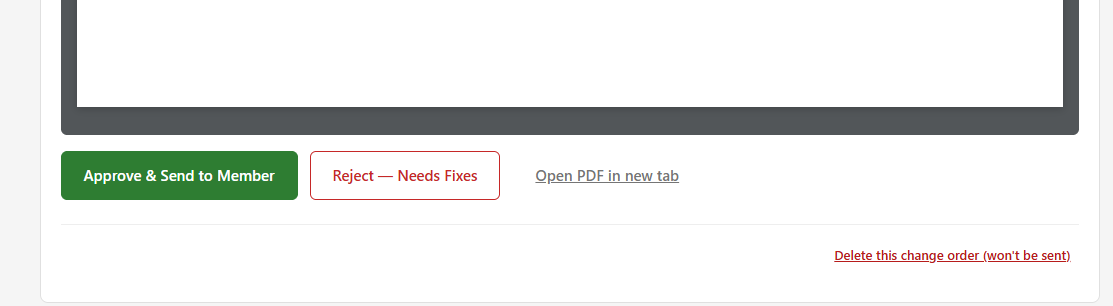
Approve & Send to Member — or Reject

Click Approve & Send to Member if everything looks correct. If something's off, click Reject — Needs Fixes and go through the process again to update the draft before sending.

Approve and Send to Member and Reject Needs Fixes buttons on the change order draft

5. Member signs → you countersign

Same signing flow as the original. Member first, then you. Once you countersign:

  • Signed CO PDF goes to S3 and the member's AGM conversation
  • CO field writeback updates the original contract record
  • The installer packet rebuilds automatically — the crew sees the revised material spec page
  • No pipeline-stage change (already approved); no new job number (reuses original)
If the change order swaps the turf product itself (different Shaw SKU), a fresh Specs & Warranty sheet auto-regenerates. If it's edging, base, or removal only, the original specs stand.
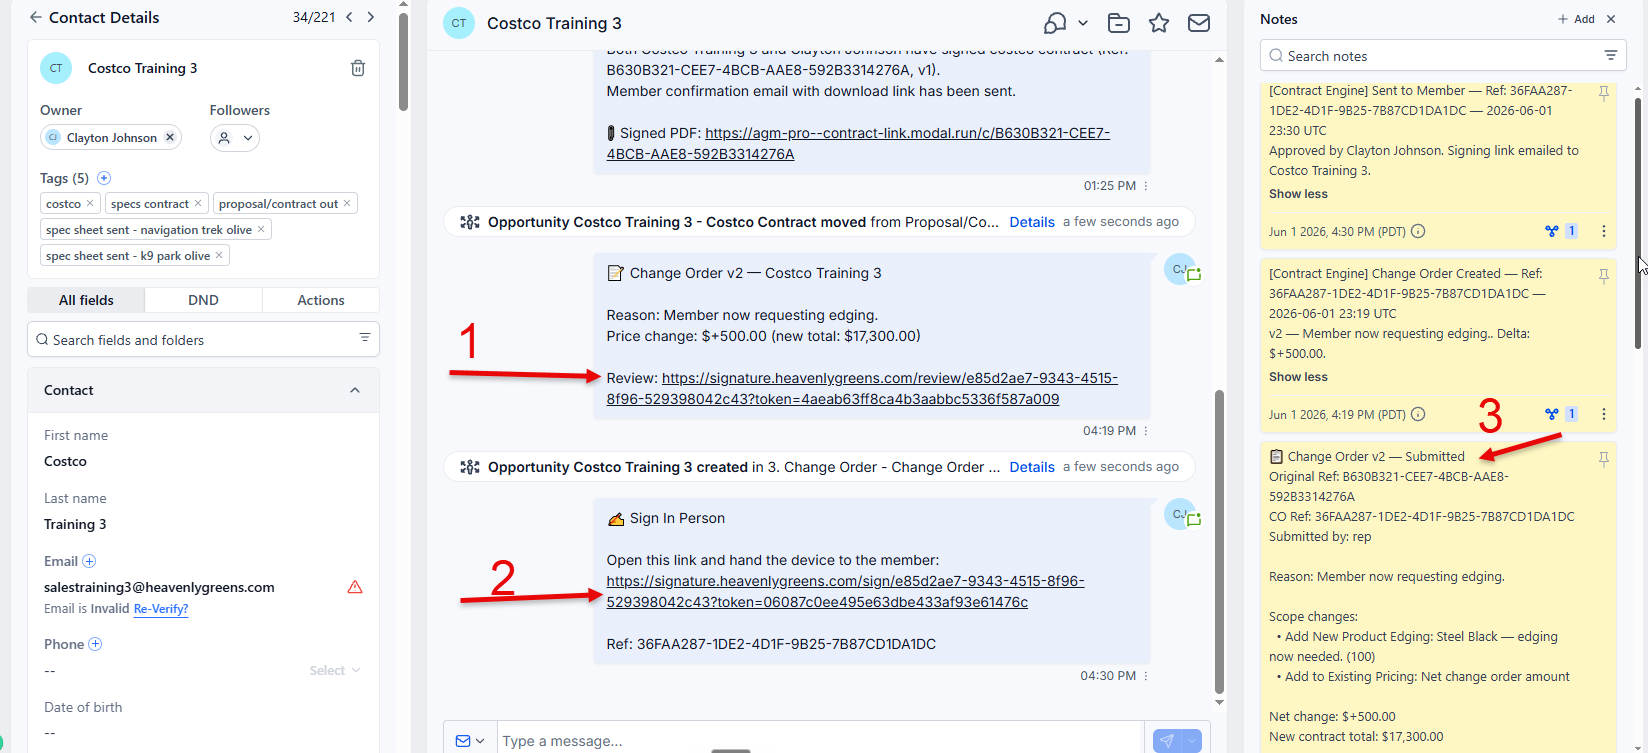
Three things on the contact view after submitting

  1. Change Order Draft — if you haven't sent it yet, the draft is visible here so you can go back and review.
  2. Sign In Person link — just like with the contract, this is available if you're with the member when completing the change order.
  3. Change order tracking — the CO information you just submitted is tracked here. The member is sent the change order by email and SMS for review and signing, the same way as the original contract.
AGM contact view after change order submit — draft link, Sign In Person link, and CO tracking

Multiple change orders on the same job

If you submit a second, third, or subsequent change order, every prior CO shows up as you build each new one — so you can see what the original scope was and every change that's been made since. All of it is tracked in the platform. The installer packet rebuilds with each change order, and the running totals roll up onto the work order and job details sheets so the crew always has the latest picture.

After the Install

What you'll see after the crew finishes.
Job Authorization

The production department sends this. You'll be notified once the member has signed it. Your action: initial it as the Heavenly Greens representative.
Job Authorization document

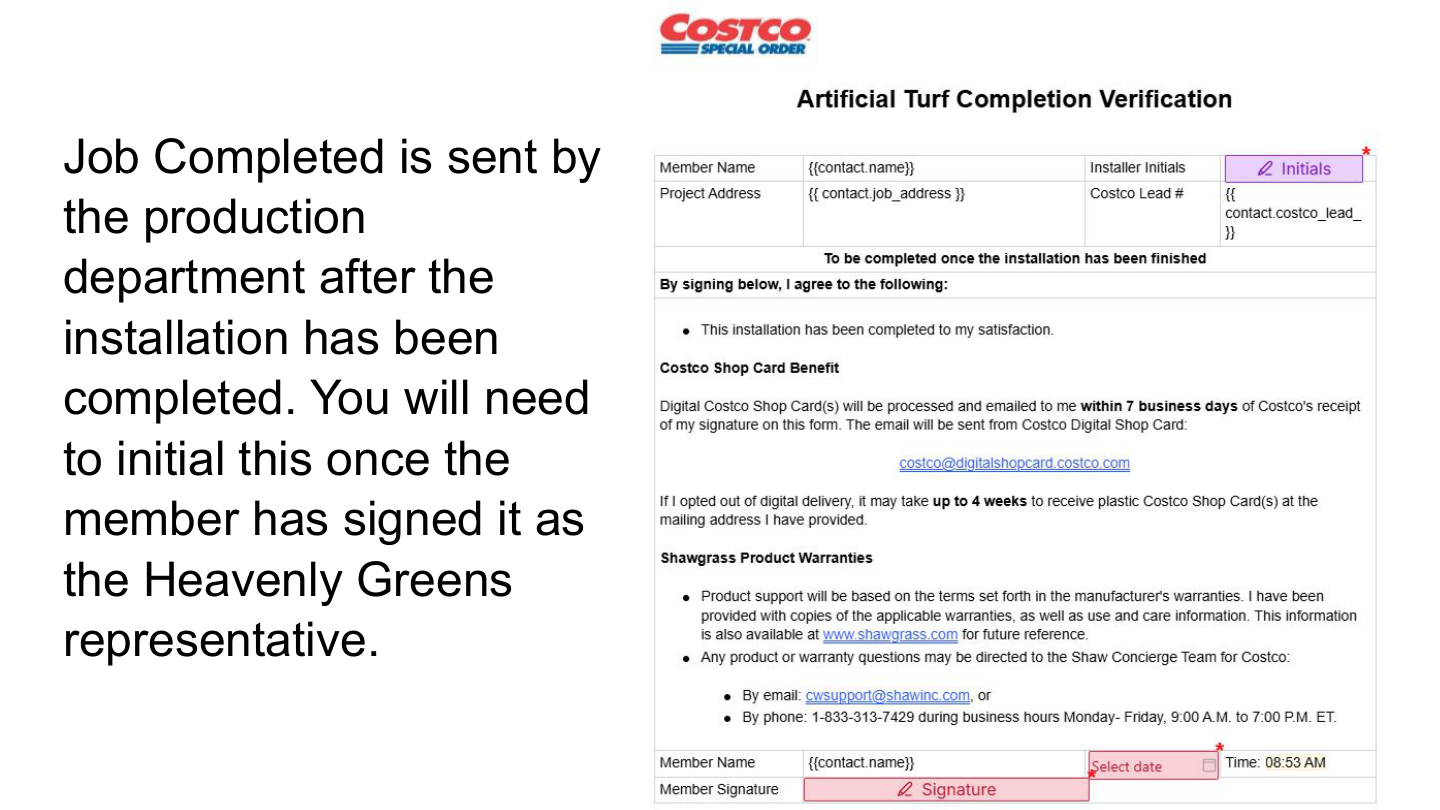
Job Completed Verification

Sent by the production department after the installation is finished. The member signs it, then you initial it as the Heavenly Greens representative.

Job Completed document

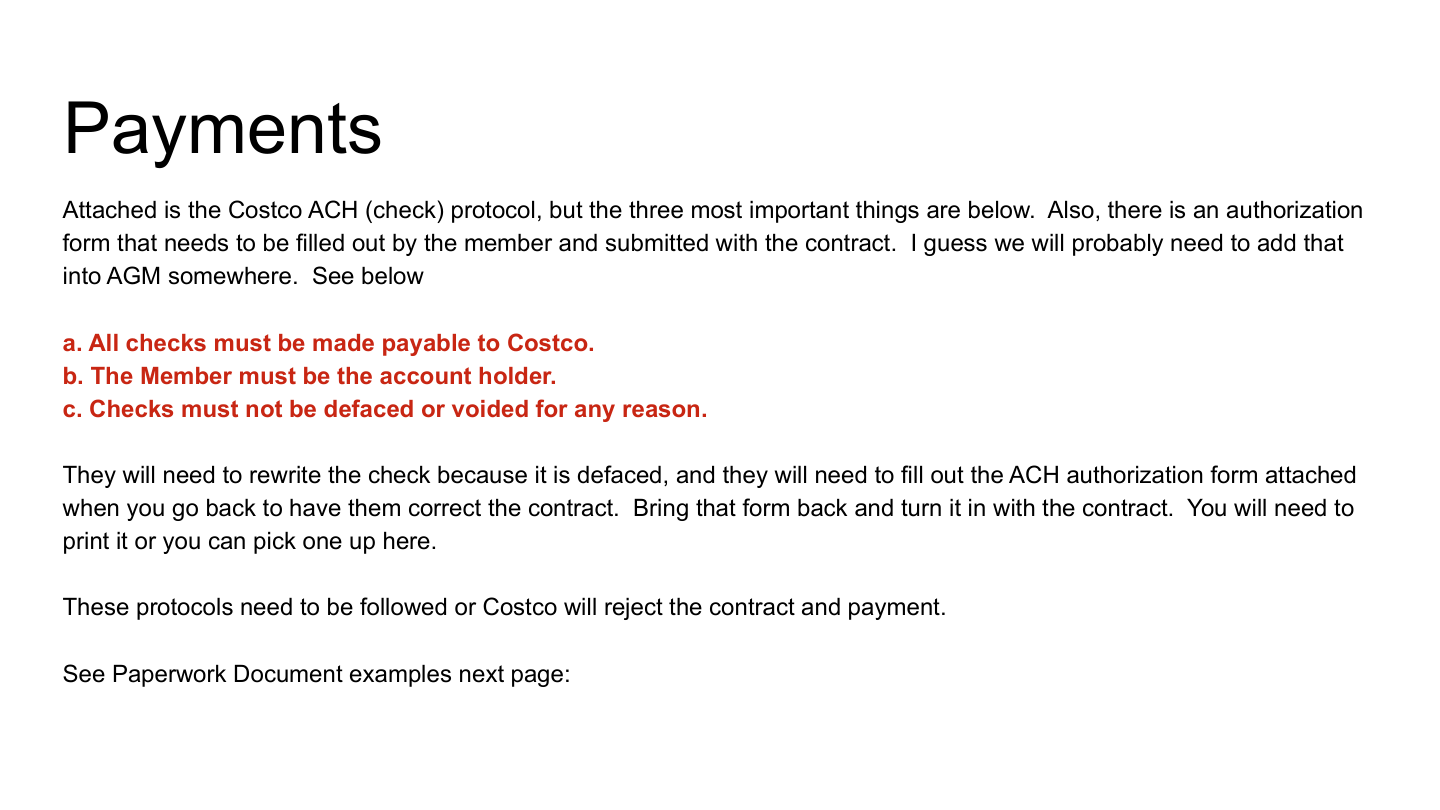
Payments — Costco ACH Protocol

Three rules that Costco will reject the contract over if not followed:

  • All checks must be made payable to Costco
  • The Member must be the account holder
  • Checks must not be defaced or voided for any reason
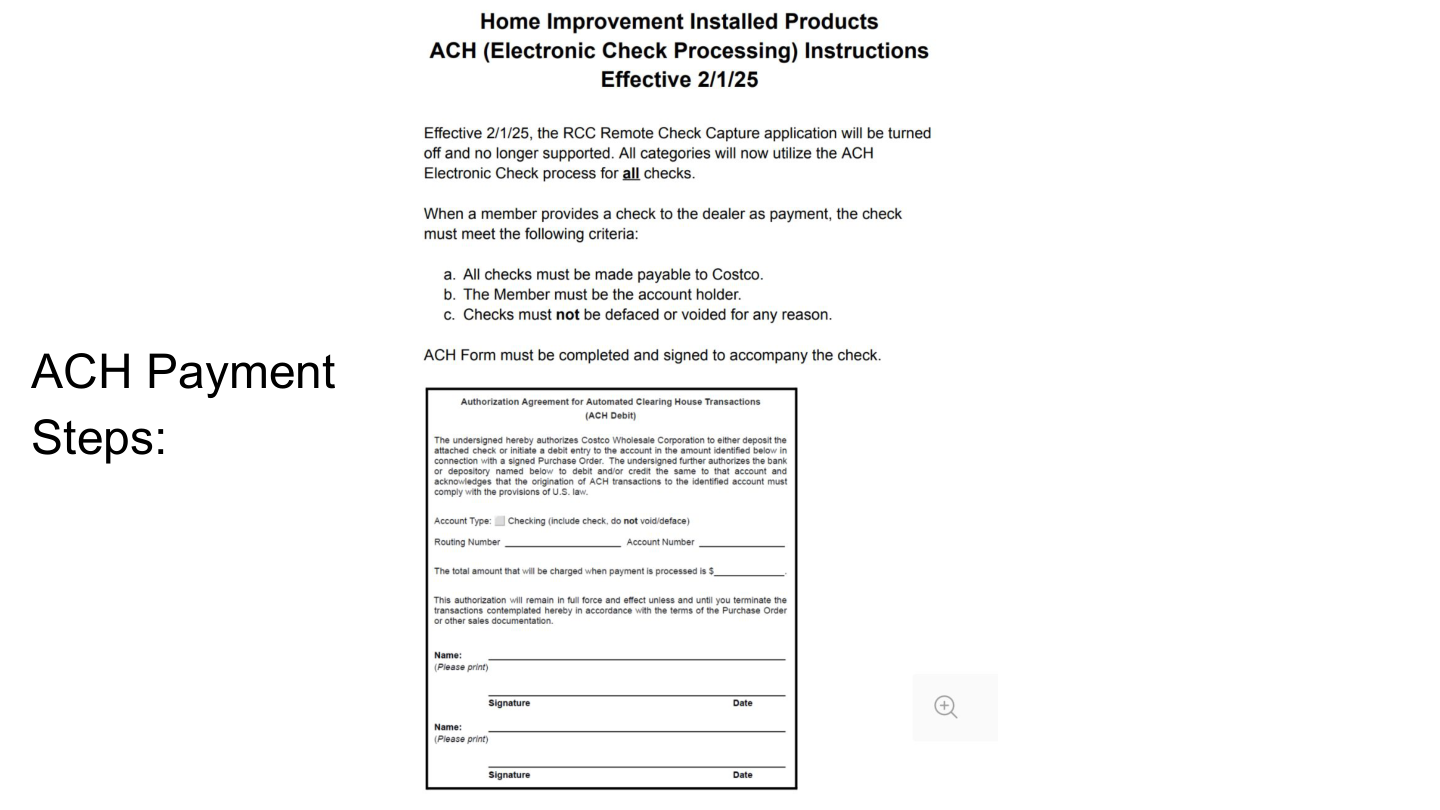
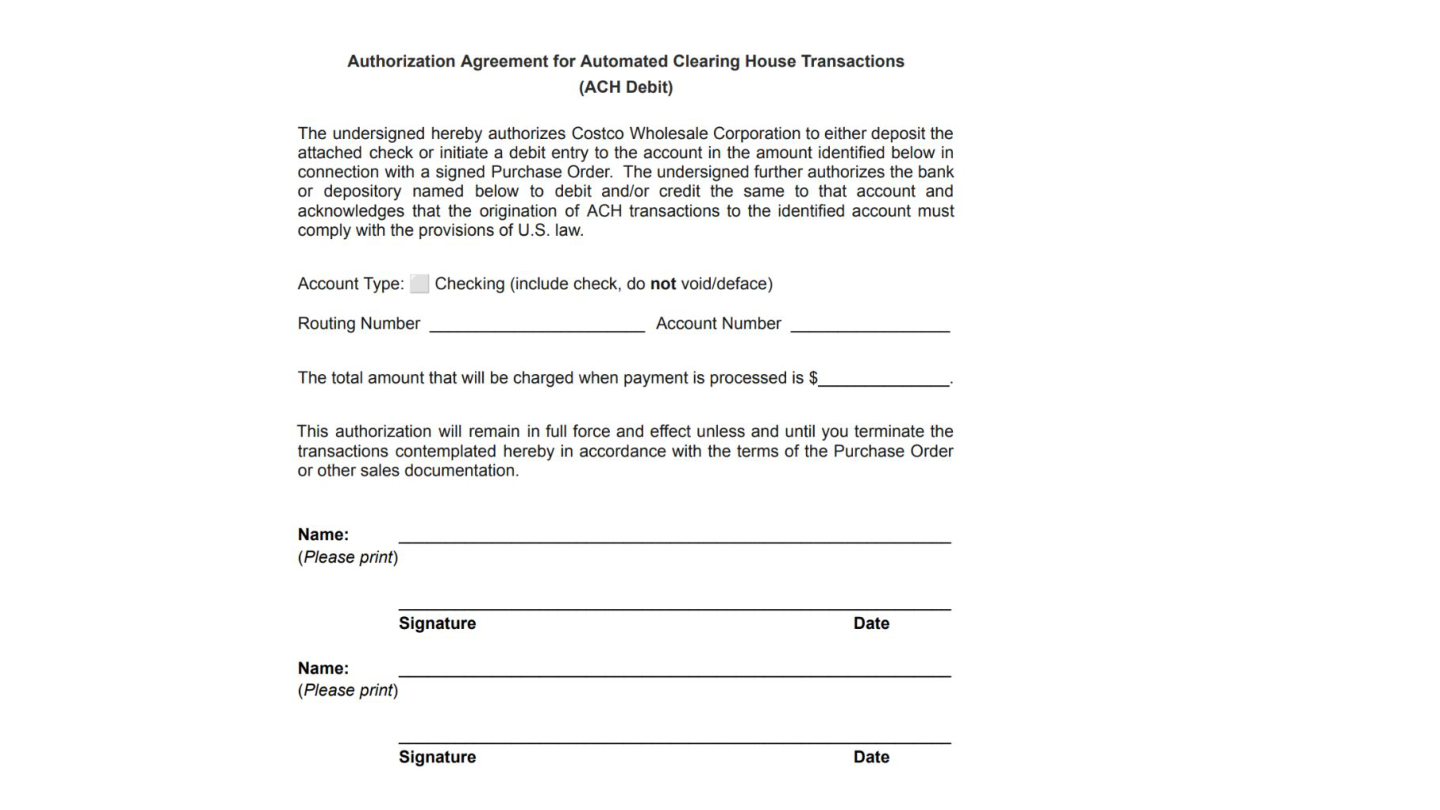
If a check is defaced: The member must rewrite the check AND fill out the ACH authorization form. Bring that form back with the corrected contract. You can print the form or pick one up at the office.
Payment protocols
ACH payment form and steps
Payment documentation example

Editing Contact Fields

Need to fix member info before or after the contract? Here's how.

Two ways to edit

You can edit contact fields from either the Contacts menu or the Conversations screen. All updates are saved automatically.

Editing contacts overview

Via Contacts: Find the member

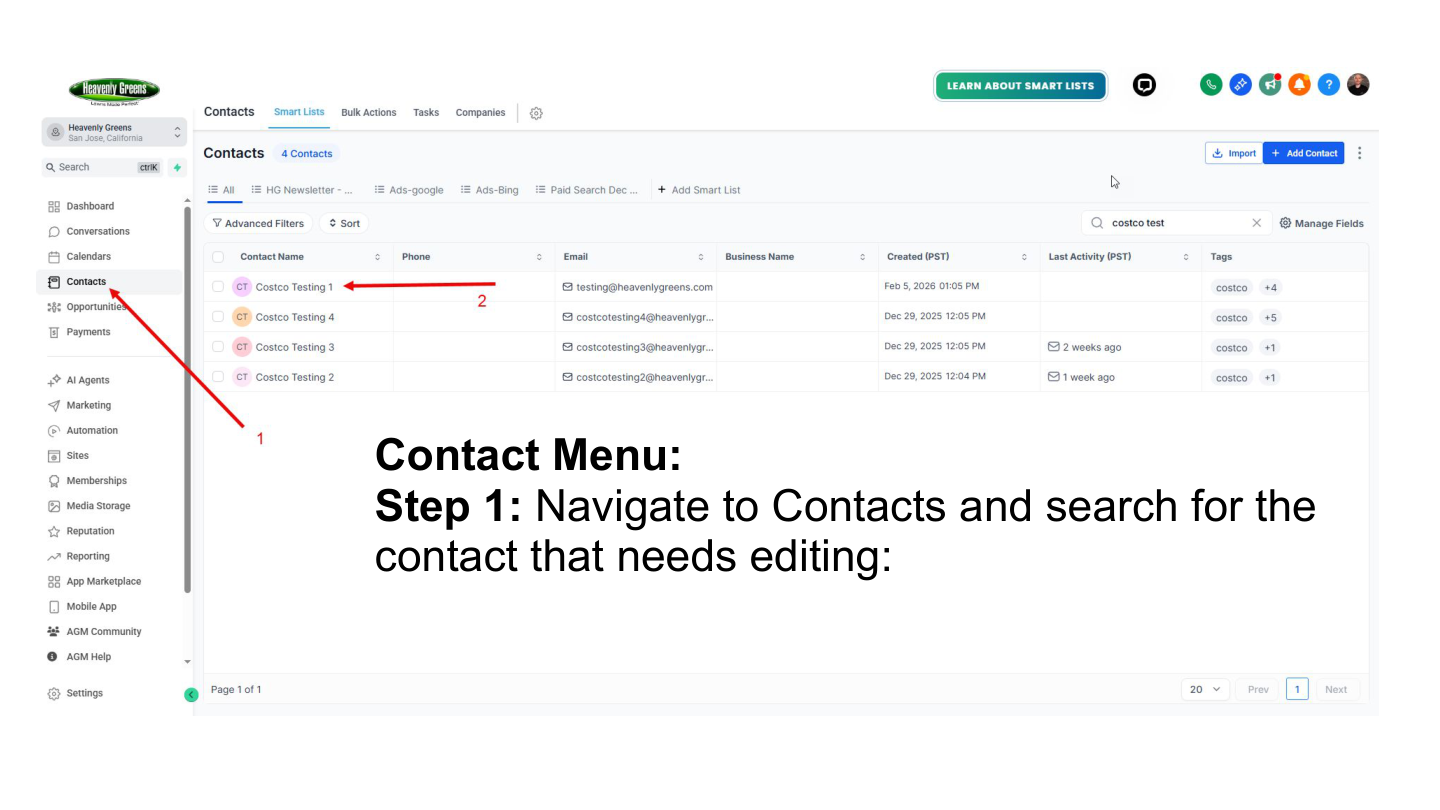
Navigate to Contacts and search for the contact that needs editing.

Search for contact in Contacts menu

Via Contacts: Edit the fields

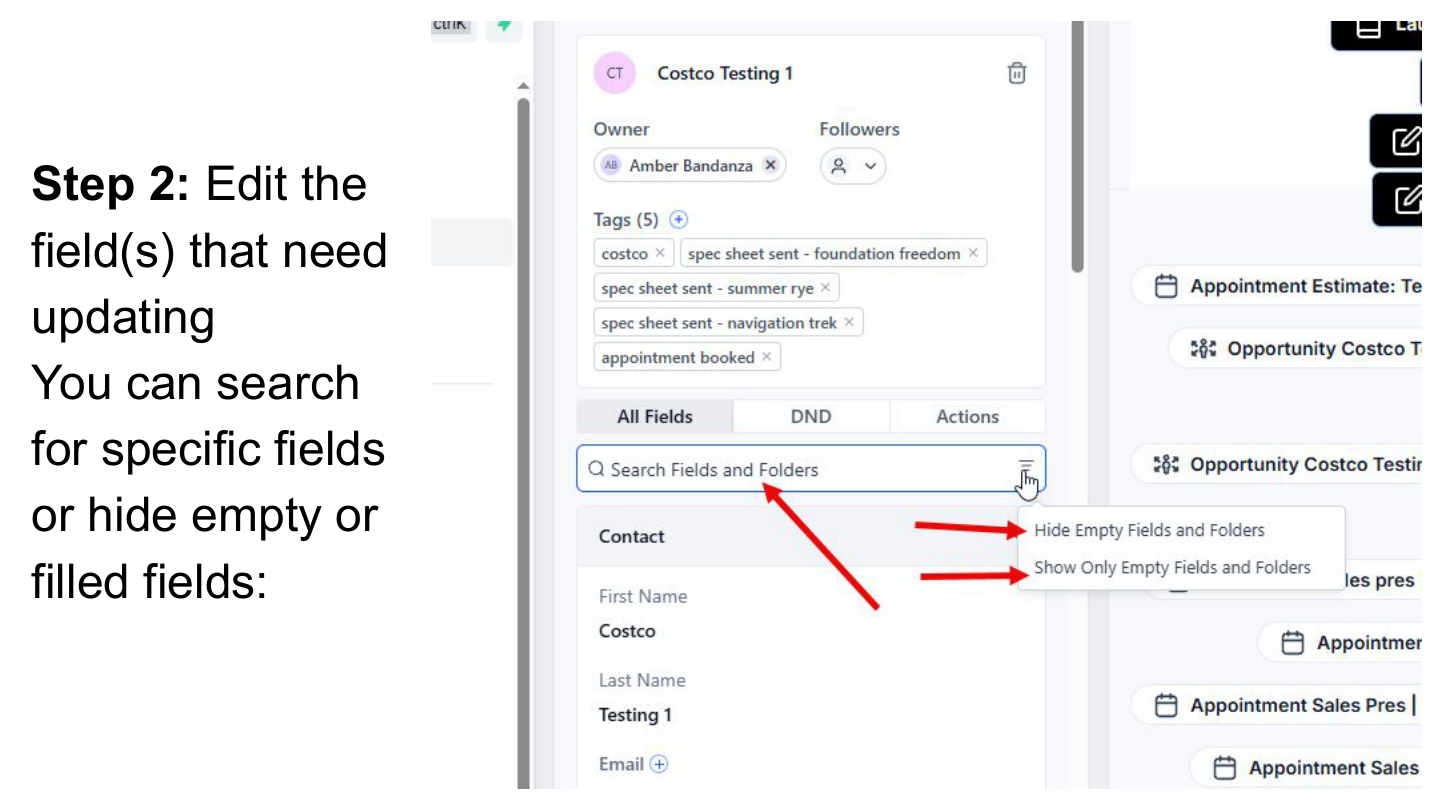
Click the field you need to update. You can search for specific fields or hide empty/filled fields to find what you need faster.

Edit contact fields
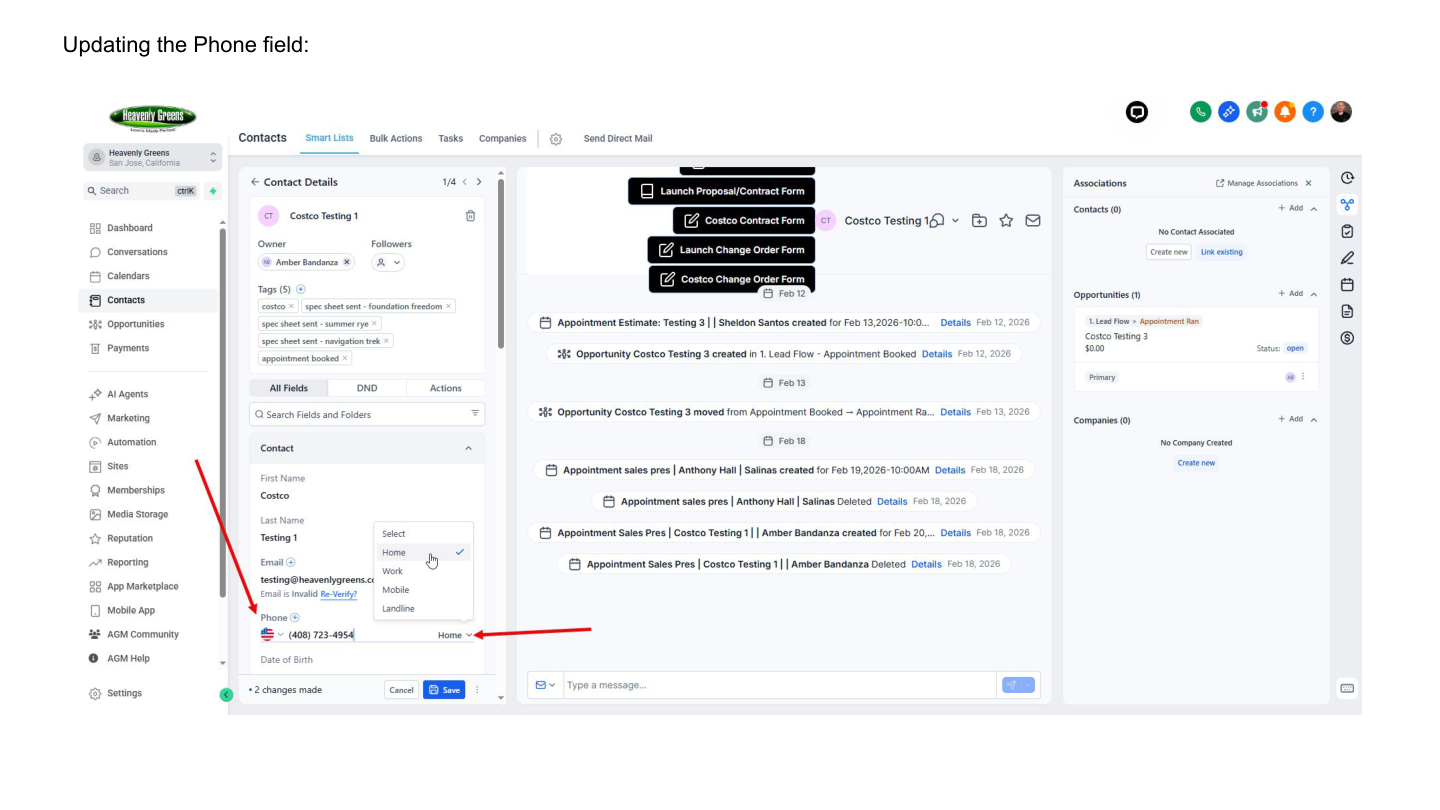
Updating phone field
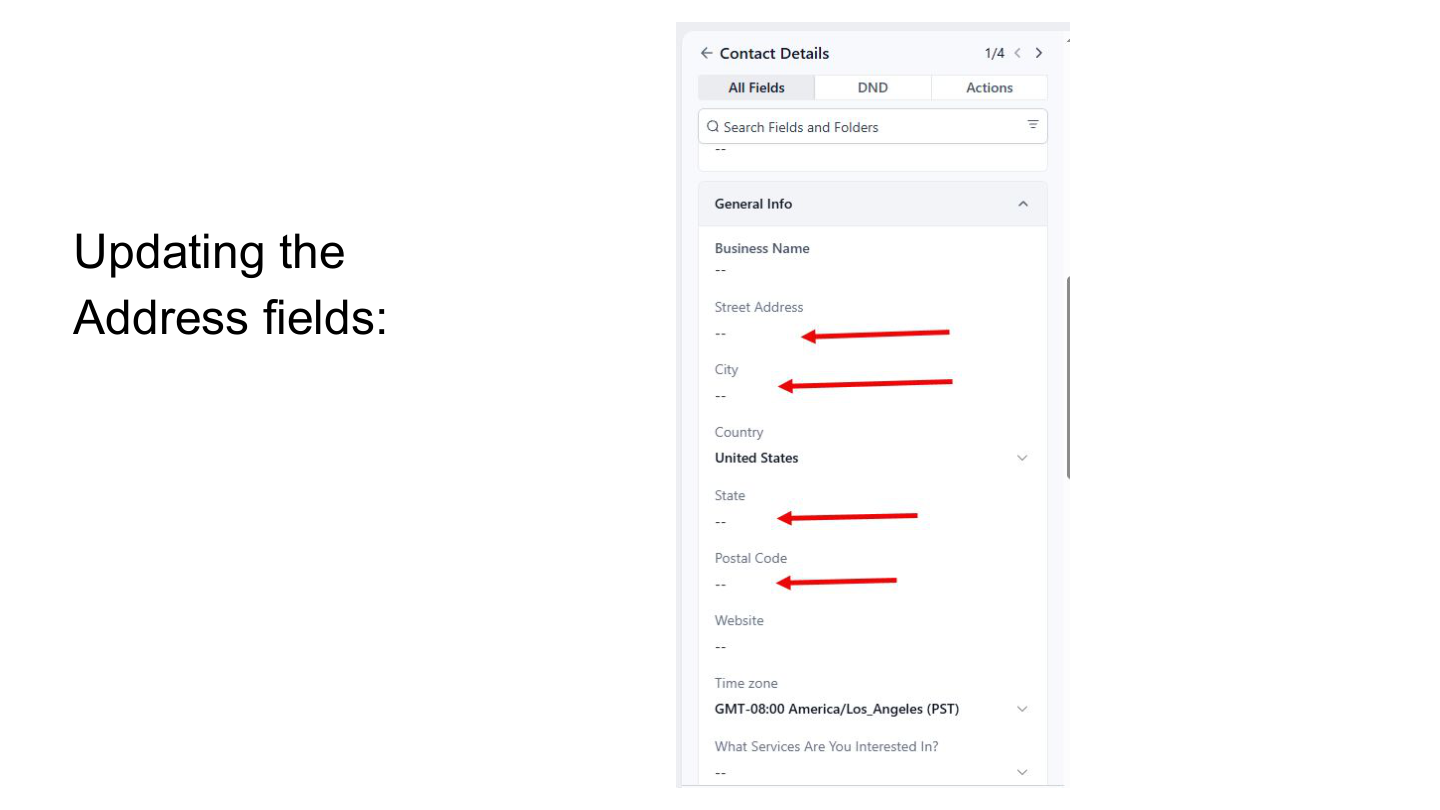
Updating address fields

Via Conversations

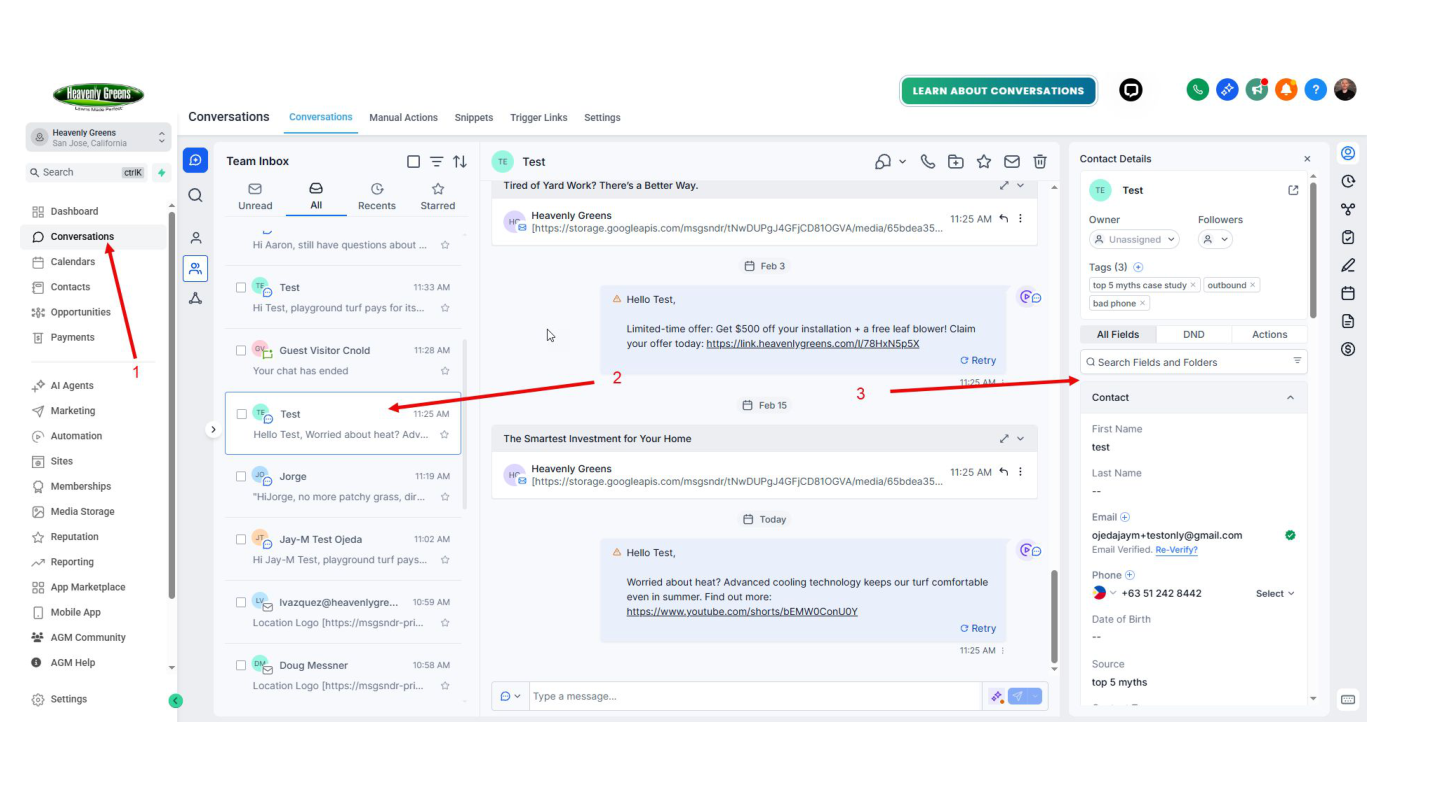
Navigate to Conversations, find the member's thread, edit fields the same way. Changes auto-save.

Find contact in Conversations
Conversation view
Edit fields in Conversations

If Something Goes Wrong

Common issues and how to fix them.

You submitted the form but nothing happened

If a required field was missing or invalid, the system will text and email you within seconds explaining what's wrong (e.g., "Missing membership number. Please update the contact and resubmit."). Fix the contact field, then resubmit the form — the same job number is reused.

The member's contract didn't send

Two common causes:

  • Contact isn't assigned to you — the system needs an active rep email to send from. Reassign the contact to yourself.
  • Your email on the contact is wrong or decommissioned — the office will see a Slack alert. Check with the office to confirm your AGM user record is right.

Member says they didn't get the link

Check the contact's Conversations tab. The email and SMS will show in their timeline. If the member's email address is wrong, fix it in the contact, then click "Resend" on the contract. If the SMS bounced (bad number), update the phone and resend.

You can always copy the in-person signing link and text it to them directly as a backup.

Member signed but I haven't been notified

You should get an email + SMS within seconds of the member signing. If you haven't seen it after 5 minutes, check the contact timeline — the system narrates every step there. If the timeline shows "Member signed" but you weren't notified, your contact info on the rep record may be stale.

The member spotted a typo after signing

Small typos (address spelling, name punctuation): fix the contact record, contact the office to log the correction. The signed PDF stands.

Material errors (wrong price, wrong product, missing line item): you'll need to withdraw and reissue. Tell the office immediately — they can void the current signing session and you start over from the form. Do not just create a Change Order to "fix" a contract error; that's only for genuine scope changes the member is agreeing to.

I made a mistake on the contract before sending it

Easy fix. On the draft review step, click "Reject" instead of approving. The session resets to draft. Fix the contact fields in AGM, resubmit the form, review the new draft. Same job number throughout.

Still stuck?

Call the office. The system logs every step of every contract — if something is genuinely broken, they can see it in real time and tell you exactly what's happening.

Your Cheat Sheet — The Whole Process on One Page

Stage 1 — Create

  1. Open the contact
  2. Fill the Costco Contract Form
  3. Submit (job # minted)

Stage 2 — Signed

  1. Review draft link
  2. Approve
  3. Member signs

Stage 3 — Countersign

  1. Get notified
  2. Sign dealer fields
  3. Engine handles delivery

Stage 4 — Packet

  1. Open Documents Uploader
  2. Upload photos + notes
  3. Packet auto-builds

Stage 5 — Change Order

  1. Create Change Order
  2. Enter line items
  3. Submit, review, sign
Create → Sign → Countersign → Packet → Change Orders
Heavenly Greens — HG / Costco Contract Guide — Sales Rep Trail Map